Kia Optima Hybrid: Seat Electrical / Seat Heater Switch Repair procedures
Kia Optima Hybrid (TF HEV) 2016-2020 Service Manual / Body Electrical System / Seat Electrical / Seat Heater Switch Repair procedures
| Inspection |
Front Seat Heater Switch
| 1. |
Disconnect the negative (-) battery terminal. |
| 2. |
Remove the floor console upper cover.
(Refer to the BD group - "Console") |
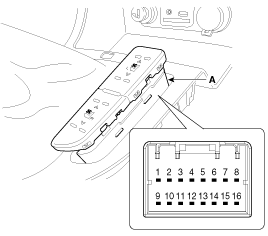
| 3. |
Remove the seat heater switch connectors from the floor console upper cover (A).
|
| 4. |
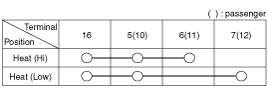
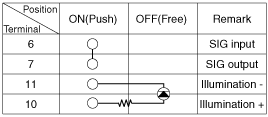
Operate each seat heater switch and check that continuity exists between the terminals.
If there is no continuity, replace the seat heater switch
[A/T]
[M/T]
|


Rear Seat Heater Switch
| 1. |
Disconnect the negative (-) battery terminal. |
| 2. |
Remove the rear door trim.
(Refer to the BD group - "Rear door") |
| 3. |
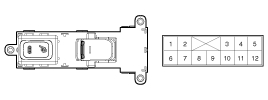
Remove the power window switch(A).
|
| 4. |
Turn rear seat heater switch ON and check that continuity exists between the terminals.
If there is no continuity, replace the seat heater switch.
|
| Installation |
| 1. |
Install the seat heater switch. |
| 2. |
Install the power window switch. |
| 3. |
Install the rear door trim. |
 Seat Heater Switch Schematic Diagrams
Circuit Diagram ...
 Seat Heater Components and Components Location
Component Location ...
Other information:
Kia Optima Hybrid (TF HEV) 2016-2020 Service Manual: Power Door Mirror Actuator Repair procedures
Inspection 1. Remove the front door quadrant delta cover. (Refer to the BD group - "Front door") 2. Disconnect the power door mirror connector from the harness. 3. Apply battery voltage to each terminal as shown in the table and verify that the mirror operates properly. Mirror Heater Inspection Turn ...
Kia Optima Hybrid (TF HEV) 2016-2020 Service Manual: Description and Operation
Description The hydraulic system consists of oil, an oil filter, oil pump, and a valve body (valves and solenoid valves). The machanical oil pump is in the transaxle and is mechanically turned by the input shaft of the transaxle. The electric oil pump is turned by an electrical motor and is mounted on ...
© 2025 Copyright www.koptimatfhev.com