Kia Optima Hybrid: SRSCM / Seat Track Position Sensor (STPS) Repair procedures
Kia Optima Hybrid (TF HEV) 2016-2020 Service Manual / Restraint / SRSCM / Seat Track Position Sensor (STPS) Repair procedures
| Removal |
| 1. |
Disconnect the battery negative cable, and wait for at least three minutes before beginning work. |
| 2. |
Remove the front seat assembly. (Refer to BD group) |
| 3. |
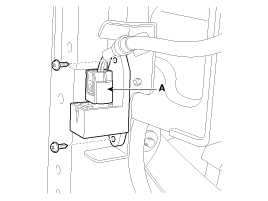
Loosen the two STPS screws, then remove the STPS after disconnecting the STPS connector.
|
| Installation |
Be sure to install the harness wires not to be pinched or interfered with other parts. |
| 1. |
Remove the ignition key from the vehicle. |
| 2. |
Disconnect the battery negative cable, and wait for at least three minutes before beginning work. |
| 3. |
Install the STPS with two screws. |
| 4. |
Install the front seat assembly. (Refer to BD group) |
| 5. |
Reconnect the battery negative cable. |
| 6. |
After installing the Seat Track Position Sensor, confirm proper system operation:
Turn the ignition switch ON, the SRS indicator should be turned on for about six seconds and then go off. |
 Seat Belt Buckle Switch (BS) Description and Operation
Description The SRSCM shall monitor the status of the driver and front passenger seat belt buckle. The SRSCM provides one pin each for the driver and front passenger seat belt buckle status input. The ...
Other information:
Kia Optima Hybrid (TF HEV) 2016-2020 Service Manual: Specifications
Specifications ItemsSpecificationsRated voltageDC 12VOperating temperature range-30°C ~ +80°C (-22 ~ +176°F)Rated loadDimmer & passing switchHigh : 0.2A (Relay load)Low : 0.2A (Relay load)Passing : 0.2A (Relay load)Lighting switchLighting : 0.2A (Relay load)Turn signal & lane change switch6.6 ...
Kia Optima Hybrid (TF HEV) 2016-2020 Service Manual: Components and Components Location
Component Location 1. Panoramaroof2. Panoramaroof switch3. Roller blind motor & slave controller4. Panoramaroof motor & controller ...
© 2025 Copyright www.koptimatfhev.com


