Kia Optima Hybrid: Seat Electrical / Seat Heater (Non-Air Ventilation) Repair procedures
Kia Optima Hybrid (TF HEV) 2016-2020 Service Manual / Body Electrical System / Seat Electrical / Seat Heater (Non-Air Ventilation) Repair procedures
| Inspection |
First Seat Heater
| 1. |
Check for continuity and measure the resistance between No.4 and No.6 terminals.
[Cushion]
[Back]
|
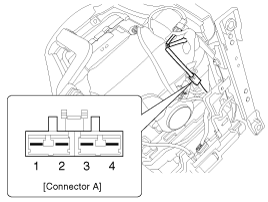
| 2. |
Measure the resistance between No.1 and No. 4 in the A connector to check the cushion and back heater.
|
| 3. |
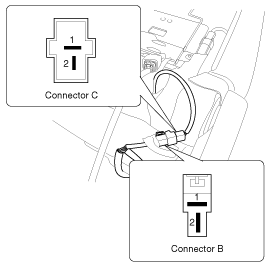
Measure the resistance between No.4 in the A and No. 1 in the B connector to check the cushion heater.
|
| 4. |
Measure the resistance between No.1 and No. 2 in the C connector to check the back heater.
|
| 5. |
Operate the seat heater after connecting the connector, and
then check the thermostat by measuring the temperature of seat surface.
|
Rear Seat Heater
| 1. |
Check for continuity and measure the resistance between terminals as below.
? Refer to the "Circuit Diagram" to check the connector B and C. |
| 2. |
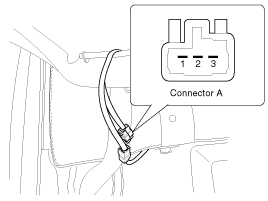
Measure the resistance between No.1 and No. 2 in the A connector to check the cushion and back heater.
|
| 3. |
Measure the resistance between No.3 in the A and No. 1 in the B connector to check the cushion heater.
|
| 4. |
Measure the resistance between No.1 and No. 2 in the C connector to check the back heater.
|
| 5. |
Operate seat warmer after connecting the 4P connector, and
then check the thermostat by measuring the temperature of seat surface.
|
 Seat Heater (Non-Air Ventilation) Schematic Diagrams
Circuit Diagram ...
 Air Ventilation Seat Components and Components Location
Components (1) 1. Ventilation blower2. Ventilation ECU3. Ventilation seat switch Components (2) Components (3) ...
Other information:
Kia Optima Hybrid (TF HEV) 2016-2020 Service Manual: Overdrive Clutch Control Solenoid Valve (OD/C_VFS) Specifications
Specifications Direct control VFS [OD/C] Control type : Normal high type Control Pressure kpa(kgf/cm?, psi)500.14 ~ 9.81(5.1 ~ 0.1, 72.54 ~ 1.42)Current value (mA)50 ~ 850 Internal resistance (?)5.1 ...
Kia Optima Hybrid (TF HEV) 2016-2020 Service Manual: Special Service Tools
Special Service Tools Tool(Number and Name)IllustrationUseDeployment tool0957A-34100AAirbag deployment tool.Deployment adapter0957A-3Q100Use with deployment tool.(DAB, CAB, BPT, APT)Deployment adapter0957A-2E110Use with deployment tool.(PAB)Deployment adapter0957A-3F100Use with deployment tool.(SAB)Dummy0957A-38200Simulator ...
© 2025 Copyright www.koptimatfhev.com