Kia Optima Hybrid: Power Door Locks / Power Door Lock Switch Repair procedures
| Inspection |
| 1. |
Disconnect the negative (-) battery terminal. |
| 2. |
Remove the front door trim panel.
(Refer to the BD group - "Front door") |
| 3. |
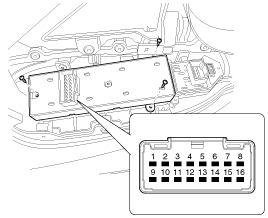
Disconnect the connector from the power window switch module.
|
| 4. |
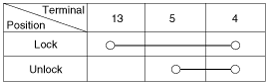
Check for continuity between the terminals in each switch position according to the table.
|
| Removal |
| 1. |
Disconnect the negative(-) battery terminal. |
| 2. |
Remove the front door trim panel.
(Refer to the BD group - "Front door") |
| 3. |
Remove the power window switch module (A) from the door trim after loosening the mounting screws (3EA).
|


| Installation |
| 1. |
Install the power window switch module. |
| 2. |
Install the door trim panel after reconnecting the relevant connectors
|
 Power Door Lock Relay Repair procedures
Inspection Diagnosis With GDS 1. It will be able to diagnose defects of power door lock with GDS quickly. GDS can operates actuator forcefully, input/output value monitoring and self diagnosis. 2. Select ...

Other information:
Kia Optima Hybrid (TF HEV) 2016-2020 Service Manual: Fuel Filter Repair procedures
Replacement 1. Remove the fuel pump (Refer to “Fuel Pump” in this group). 2. Disconnect the electric pump wiring connector (A) and the fuel sender connector (B). 3. Remove the cushion pipe fixing clip (C), and then separate the head assembly (D). 4. Remove the return nozzle (B) after releasing the ...
Kia Optima Hybrid (TF HEV) 2016-2020 Service Manual: Panoramaroof Components and Components Location
Components 1. Roof moulding [RH]2. Roof moulding [LH]3. Movable glass4. Cover [RH]5. Wind deflector assembly6. Front cover assembly7. Panoramaroof frame assembly8. Cover [LH]9. Shield cover10. Wind deflector bar link11. Roller blind assembly12. Movable glass motor assembly13. Roller blind motor assembly14. ...