Kia Optima Hybrid: Fuel Delivery System / Fuel Filter Repair procedures
| Replacement |
| 1. |
Remove the fuel pump (Refer to “Fuel Pump” in this group). |
| 2. |
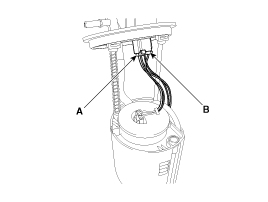
Disconnect the electric pump wiring connector (A) and the fuel sender connector (B).
|
| 3. |
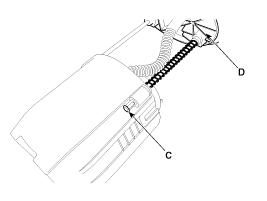
Remove the cushion pipe fixing clip (C), and then separate the head assembly (D).
|
| 4. |
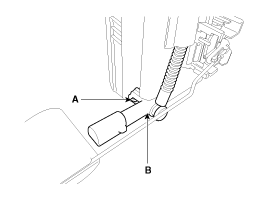
Remove the return nozzle (B) after releasing the fixing hook (A).
|
| 5. |
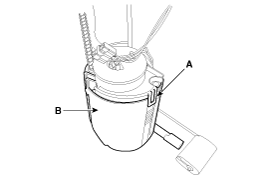
Remove the reservoir-cup (B) after releasing the fixing hooks (A).
|
| 6. |
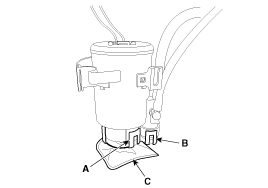
Remove the pre-filter (C) after releasing the fixing hooks (A,B).
|
| 7. |
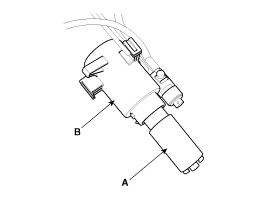
Separate the electric pump motor (A) from the fuel filter (B).
|
| 8. |
Replace new fuel filter. |
 Fuel Pump Repair procedures
Removal 1. Release the residual pressure in fuel line (Refer to “Release Residual Pressure in Fuel Line” in this group). 2. Remove the fuel tank. (Refer to "Fuel Tank" in this group) 3. Disconnect ...
 Filler-Neck Assembly Repair procedures
Removal 1. Lift the vehicle. 2. Disconnect the fuel filler hose (A). 3. Disconnect the ventilation hose (B) from the fuel tank air filter. 4. Open the fuel filler door and then remove the filler-neck installation ...
Other information:
Kia Optima Hybrid (TF HEV) 2016-2020 Service Manual: Special Service Tools
Special Service Tools Tool Name / NumberIllustrationDescription09581-11000Piston expanderUsed when spreading the front and rear brake piston.09580-3D100Air bleeding toolUsed when bleeding the air in the brake system.0k585-E8100Air bleeding toolUsed when bleeding the air in the brake system. Personal ...
Kia Optima Hybrid (TF HEV) 2016-2020 Service Manual: Photo Sensor Repair procedures
Inspection 1. Ignition "ON" 2. Using the scan tool. 3. Emit intensive light toward photo sensor using a lamp, and check the output voltage change. 4. The voltage will rise with higher intensive light and reduce with lower intensive light. 1. Auto Light Signal2. Auto Light Signal Signal3. Photo Signal ...

