Kia Optima Hybrid: Evaporative Emission Control System / NVLD(Natural Vacuum Leakage Detection) Repair procedures
Kia Optima Hybrid (TF HEV) 2016-2020 Service Manual / Emission Control System / Evaporative Emission Control System / NVLD(Natural Vacuum Leakage Detection) Repair procedures
| Removal |
| 1. |
Turn the ignition switch OFF and disconnect the battery negative (-) terminal. |
| 2. |
Disconnect the NVLD connector (A). |
| 3. |
Disconnect the ventilation hoses (B,C).
|

| 4. |
Remove the NVLD after by loosening the bolts (A).
|

| Installation |
| • |
Install the component with the specified torques. |
| • |
Note that internal damage may occur when the component is dropped.
If the component has been dropped, inspect before installing.
|
| 1. |
Install in the reverse order of removal. |
NVLD mounting bolt:
2.3 ~ 3.3 N.m (0.2 ~ 0.3 kgf.m, 1.7 ~ 2.5 lb-ft) |
| Inspection |
[Mechanical inspection]
| 1. |
Turn ignition switch OFF. |
| 2. |
Disconnect the NVLD connector. |
| 3. |
Remove the NVLD. |
| 4. |
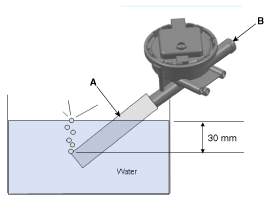
Connect the hose (A) to the canister hose connected port as below. |
| 5. |
After immersing the hose (A) in water, Apply more than 6 mbar (positive) pressure to Atmosphere port (B). |
| 6. |
If the NVLD is normal, many bubbles will indicate large leak.
|

[Electrical inspection]
| 1. |
Connect power supply line and ground line to the NVLD terminals as below. |
| 2. |
Measure current between the NVLD terminal 1 and battery (+) terminal during NVLD switch open. |
| 3. |
Measure current between the NVLD terminal 1 and battery (+) terminal during NVLD switch closed. |
| 4. |
Measure current between the NVLD terminal 2 and battery (+) terminal during NVLD switch open. |
| 5. |
Check the current is within the specification.
|

 NVLD(Natural Vacuum Leakage Detection) Schematic Diagrams
Circuit Diagram ...

Other information:
Kia Optima Hybrid (TF HEV) 2016-2020 Service Manual: Troubleshooting
Troubleshooting Examples of False-Alarm Occurrence from system characteristics (It’s not a problem) – Characteristics of EM Wave : EM Waves are reflected against all material and especially metal very well. Reflections of EM Waves are varies with the shape of object. (? EM : Electro Magnetic) – ...
Kia Optima Hybrid (TF HEV) 2016-2020 Service Manual: Audio Unit Repair procedures
Removal • Take care not to scratch the center fascia panel and related parts. • Eject all the disc before removing the audio unit to prevent damaging the CD player''s load mechanism. 1. Disconnect the negative (-) battery terminal. 2. Using a screwdriver or remover, remove the crash ...
© 2025 Copyright www.koptimatfhev.com