Check the battery voltage. (Low beam will be on when the battery voltage above 9V.)
(2)
Check the fuse and relay.
(3)
Check the polarity of ballast. (If the polarity are changed, low beam doesn''t lighten)
(4)
Check the bulb connector securely.
(5)
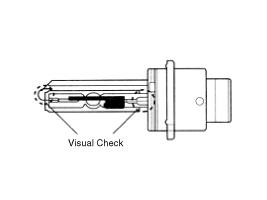
Visually bulb checking (no filament): damaged glass, damaged for upper parts and lower parts of glass tube.
(6)
After (1)~(5), replace the ballast and the ignitor. (ballast assembly).
If a headlamp goes out after a period of operation but will
immediately relights when the headlamp switch is cycled it is likely the
HID lamp needs to be replaced.
2.
Service procedure and warning (HID)
No.
Item
Service procedures
Warning
Remarks
1
Replacement of lamp assembly
1.
Disconnect the power connector from the lamp.
2.
Remove and replace the lamp assembly.
3.
Connect the power connector.
•
Disconnect the head lamp power connector to avoid high voltage.
•
Other description is the same as the halogen bulbs.
2
Replacement of the Bulb
1.
Disconnect the power connector from the lamp. (head lamp, turn signal, head lamp leveling device)
2.
Remove the lamp assembly.
3.
Remove the ballast and dust cover.
4.
Remove the bulb socket and replace the bulb.
5.
Installation is the reverse of removal.
•
Disconnect the head lamp power connector to avoid high voltage.
•
Be careful not to damage the bulb and use genuine bulbs only.
•
Do not apply excessive force and fit it correctly.
3
Replacement of the Ballast (with built-in ignitor)
1.
Disconnect the power connector from the lamp.
2.
Remove the lamp and then the ballast and the dust cover.
3.
Remove the head lamp leveling device and then the bulb socket.
4.
Connect the bulb socket on the replacement ballast and install the leveling device.
5.
Installation is the reverse of removal.
•
Disconnect the head lamp power connector to avoid high voltage.
•
Replace the ballast only and install the used lamp.
•
Replace the sub assembly except the ballast.
4
Others
1.
Power supply should be according to the rated capacity.
2.
Use the rated fuse and wire.
3.
Bulb socket shall be free from moisture or dirt.
4.
Do not apply the ballast severe shock, water, or extreme
•
All parts should be serviced only at specified service centers.
•
HID lamp should not be installed on other cars (Dangerous, fire may occur.)
HID lamp shall not be used on other cars.(Fire may occur.)
Fire may occur when HID lamp initially lights due to the fact
that arc-discharge generates high voltage (max. 30,000V) and high
current (12-13A), and are different from the halogen lamp specification.
3.
Understanding of color change by replacement of HID bulb.
(1)
The cause of HID color change.
(Change of color is HID feature)
–
The change of color occur during mixing three Elements in the HID bulb.
–
Color Coordinates by Lifetime
–
Chemical compounds in an arc tube :
1)
Xenon gas(an inert gas , protection of arc tube)
2)
Mercury( increase voltage, protection of arc tube, blue in the first 3 second )
3)
Metal halide
•
Natrium(Yellow) : 0.12mg
•
Scandium(Blue) : 0.06mg
•
Iodine(Halogen) : 0.02mg
(2)
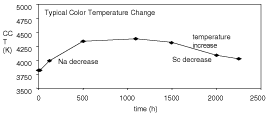
Change of Color by Lighting Up Time
–
It needs 4 seconds at least for stabilization.
At first, you can see the blue for 3 seconds because of Mercury.
–
After stabilization, change of color occur by metal halide.
•
0 Hour : Yellow( Na is more than Sc. )
•
10 Hour : Bright Blue (Na and Sc are similar ratio.)
•
1000Hour more : Blue ( Sc is more than Na.)
–
The end of lifetime : When HID used up Natrium and Scandium, a beam of light will be dark suddenly.
so you can see the red, purple and turn on and off.
Characteristic
1.
Durable for vibration as there is no filament.
2.
HID lamp had a more long life than halogen lamp.
3.
Does not operate if polarity is changed.
4.
Operating input voltage : 9-16V
Removal
1.
Disconnect the negative (-) battery terminal.
2.
Remove the front bumper.
(Refer to the BD group - "Front bumper")
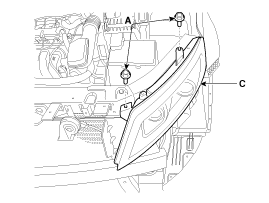
3.
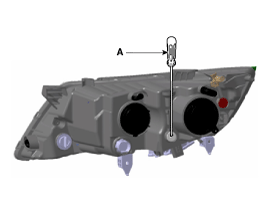
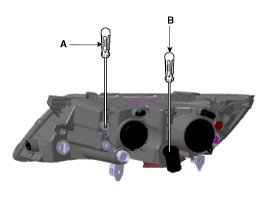
Loosening the head lamp mounting bolts (A) (2EA) and disconnect the head lamp connector (B).
Then, remove the head lamp assembly (C).
–
Take care not to scratch the head lamp lens or fender.
Take care that holding clip (A) is not to be damaged.
4.
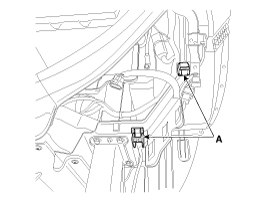
In case of HID type, disconnect the head lamp leveling actuator connector (A).
5.
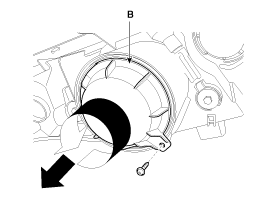
Remove the dust caps from the head lamp assembly after turning in the counter clock-wise direction.
A : Head Lamp (High) Cap
B : Head Lamp (Low) Cap
Installation
1.
Install the head lamp bulbs.
2.
Connect the connectors.
3.
Install the head lamp bolts (2EA).
4.
Connect the negative (-) battery terminal.
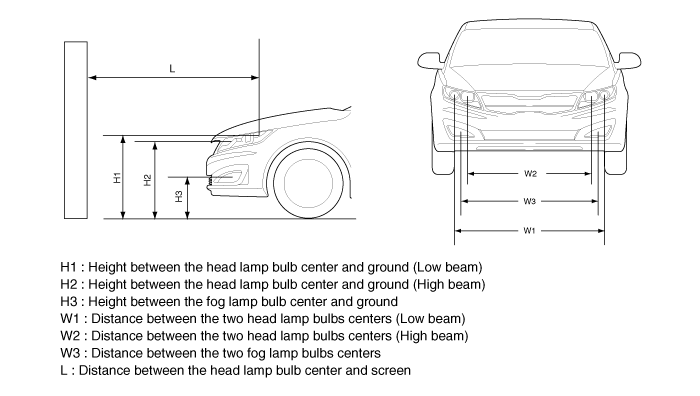
Head Lamp Aiming Instructions
The head lamps should be aimed with the proper beam-setting
equipment, and in accordance with the equipment manufacturer''s
instructions.
If there are any regulations pertinent to the aiming of head
lamps in the area where the vehicle is to be used, adjust so as to meet
those requirements.
Alternately turn the adjusting gear to adjust the head lamp
aiming. If beam-setting equipment is not available, proceed as follows:
1.
Inflate the tires to the specified pressure and remove any loads from the vehicle except the driver, spare tire, and tools.
2.
The vehicle should be placed on a flat floor.
3.
Draw vertical lines (Vertical lines passing through
respective head lamp centers) and a horizontal line (Horizontal line
passing through center of head lamps) on the screen.
4.
With the head lamp and battery in normal condition, aim the
head lamps so the brightest portion falls on the horizontal and vertical
lines.
[Standard]
A : Veritcal (Hi & Low)
[Option]
A : Veritcal (Hi)
B : Veritcal (Low)
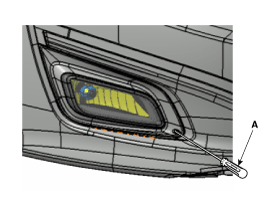
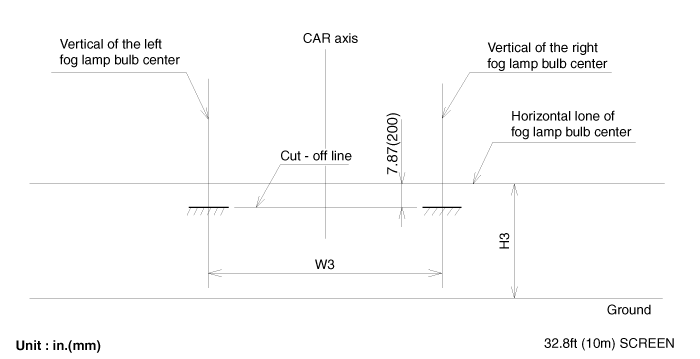
Front Fog Lamp Aiming
The front fog lamps should be aimed as the same manner of the head lamps aiming.
With the front fog lamps and battery normal condition, aim the front fog lamps by turning the adjusting screw (A) with a driver.
[Standard]
[Option]
Head Lamp And Fog Lamp Aiming Point
[Standard]
[Option]
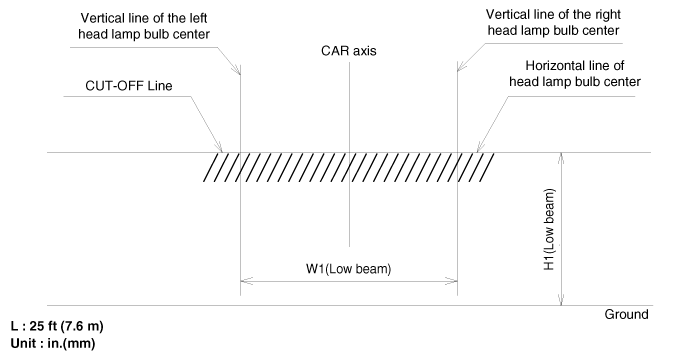
1.
Head Lamp (Low beam)
–
Turn the low beam on without driver aboard.
–
The cut-off line should be projected in the cut-off line shown in the picture.
–
If head lamp leveling device is equipped, adjust the head lamp leveling device switch with 0 positions.
2.
Turn the front fog lamp on without the driver aboard.
The cut-off line should be projected in the allowable range (shaded region)
Replacement
Head Lamp (Low)
[Standard]
1.
Turn the head lamp switch off.
2.
Disconnect the power connector from the lamp.
3.
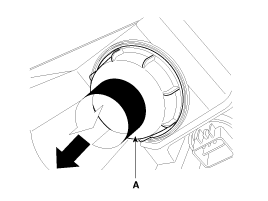
Remove the head lamp (Low) cap.
4.
Disconnect the connector (A).
5.
Turn the bulb and socket (A) counter clockwise to remove the turn signal bulb.
6.
Installation is the reverse of removal.
Head Lamp (Low)
[HID]
1.
Turn the head lamp switch off.
2.
Disconnect the power connector from the lamp.
3.
Remove the head lamp (Low) cap.
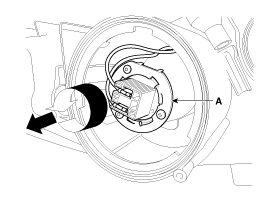
4.
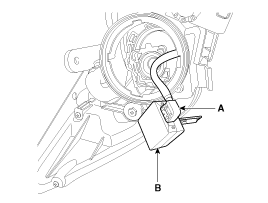
Remove the ignitor fixed clip (A).
5.
Remove the ignitor (B) after disconnecting the connector (A).
6.
Installation is the reverse of removal.
Turn the head lamp switch off to avoid high voltage
Be careful not to damage the bulb and use genuine bulbs only
•
Do not apply excessive force and fit it correctly.
•
Confirm the bulb locking
Ballast
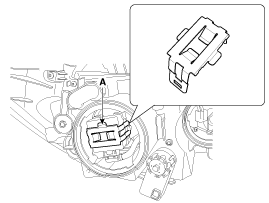
1.
Turn the head lamp switch off.
2.
Remove the head lamp assembly.
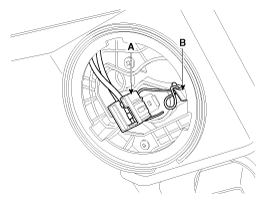
3.
Disconnect the power connector from the lamp.
4.
Remove the ballast (A) after removing the screws (3EA) and connector.
Be careful not to be damaged when disconnecting the ballast connector.
5.
Installation is the reverse of removal.
•
Turn the head lamp switch off to avoid high voltage.
•
HID lamp shall not be used on other cars.(Fire may occur.)
•
Fire may occur when HID lamp initially lights due to the fact
that arc-discharge generates high voltage (max. 20,000V) and high
current (12-13A), and are different from the halogen lamp specification.
•
Install the dust cover after confirming the locking state between bulb and bulb holder.
•
When testing the HID head lamp, turn the power on or off with switch between power supply and lamp because of high voltage.
•
Do not operate the head lamp switch with the bulb not installed, because it generates spark momently.
HID Head Lamp 1. Bulb (1) Elements Xenon gas: Xenon gas activates the initial reaction for rapid illuminating. Molybdenum electrode: anode arcing Metal halide salts: color composing component (2) Lightening ...
Description Front seat belt anchor pretensioner operates as well as belt pretensioner at the same time If it gets into its deploy condition after a collision. It is located at near anchor on front seat and it is an equipment to make up for the existing short stroke. Front seat belt anchor pretensioner ...


 Head Lamps Description and Operation
 Room Lamp Repair procedures