Kia Optima Hybrid: IMS (Integrated Memory) / IMS Power Seat Control Repair procedures
Kia Optima Hybrid (TF HEV) 2016-2020 Service Manual / Body Electrical System / IMS (Integrated Memory) / IMS Power Seat Control Repair procedures
| Inspection |
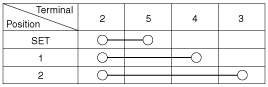
| 1. |
Disconnect the IMS control switch connector.
|
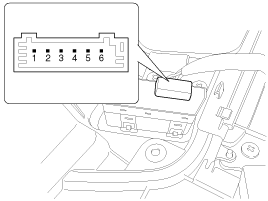
| 2. |
With the power IMS control switch in each position, make sure
that continuity exists between the terminals below. If continuity is
not as specified, replace the IMS control switch.
|
| Removal |
| 1. |
Disconnect the negative (-) battery terminal. |
| 2. |
Remove the front door trim panel.
(Refer to the BD group - "Front door") |
| 3. |
After removing the mounting screws (4EA) and switch connector
(A), then remove the IMS control switch (B) from the front door trim
panel.
|

| Installation |
|

| 1. |
Connect the connectors and reassemble the IMS control switch. |
| 2. |
Install the front door trim. |
 IMS Power Seat Control Schematic Diagrams
Circuit diagram ...
 IMS Control Switch Schematic Diagrams
Circuit diagram ...
Other information:
Kia Optima Hybrid (TF HEV) 2016-2020 Service Manual: Head Lamps Description and Operation
HID Head Lamp 1. Bulb (1) Elements Xenon gas: Xenon gas activates the initial reaction for rapid illuminating. Molybdenum electrode: anode arcing Metal halide salts: color composing component (2) Lightening principle When Xenon gas and metal halide salt will discharge the molybdenum anode in a capsule, ...
Kia Optima Hybrid (TF HEV) 2016-2020 Service Manual: Specifications
Specifications ItemSpecificationTypeMotor Driven Power SteeringSteering gearTypeRack & PinionRack stroke148mm (5.82in)Steering angle(Max.)Inner40.05° ± 1.5°Outer32.95° Tightening Torques ItemTightening torque (kgf.m)Nmkgf.mlb-ftHub nuts88.3 ~ 107.99.0 ~ 11.065.1 ~ 79.6Steering wheel lock nut39.2 ...
© 2025 Copyright www.koptimatfhev.com