Kia Optima Hybrid: Interior / Roof Trim Repair procedures
| Replacement |
|

| 1. |
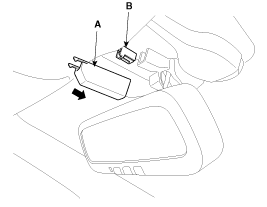
Loosen the mounting screws, then remove the sunvisor (A) and retainer (B).
|
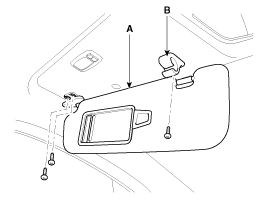
| 2. |
Installation is the reverse of removal. |
|
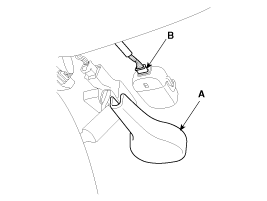
| 1. |
Remove the covers (A) and screws, then remove the assist handle (B).
|
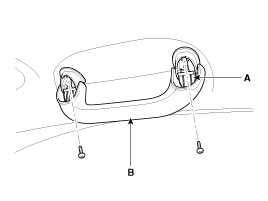
| 2. |
Installation is the reverse of removal. |
|
| 1. |
Using a screwdriver or remover, remove the room lamp cover (B). |
| 2. |
After loosening the mounting screws, then remove the room lamp (A).
|
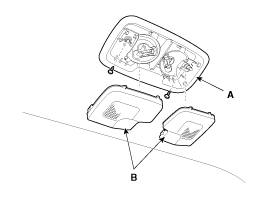
| 3. |
Disconnect the connector (A).
|
| 4. |
Installation is the reverse of removal.
|

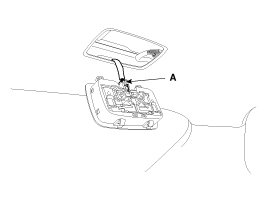
| 1. |
Using a screwdriver or remover, remove the vanity lamp (A). |
| 2. |
Disconnect the vanity lamp connector (B).
|
| 3. |
Installation is the reverse of removal.
|
|
| 1. |
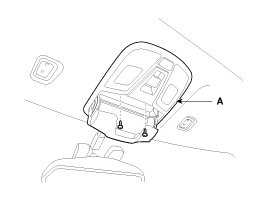
After loosening the mounting screws, then remove the overhead console assembly (A).
|
| 2. |
Disconnect the connectors (A).
|
| 3. |
Installation is the reverse of removal.
|
|
| 1. |
Remove the following items:
|
| 2. |
Remove the ECM mirror cover (A). |
| 3. |
Disconnect the ECM mirror connector (B).
|
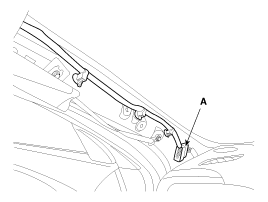
| 4. |
Remove the rain sensor cover (A). |
| 5. |
Disconnect the rain sensor connector (B).
|
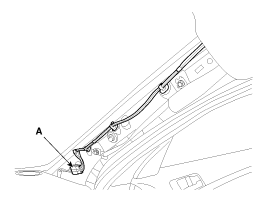
| 6. |
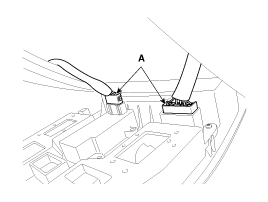
Disconnect the roof trim main connectors (A).
[Driver''s]
[Passenger''s]
|
| 7. |
Disconnect the antenna connector (A).
|

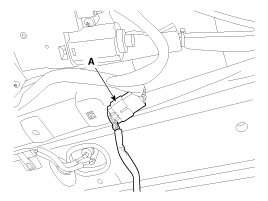
| 8. |
Disconnect the connector (A).
|
| 9. |
Using a clip remover, detach the roof trim assembly mounting clips. |
| 10. |
Pull back the roof trim assembly (A) through the place where the windshield glass was removed.
|
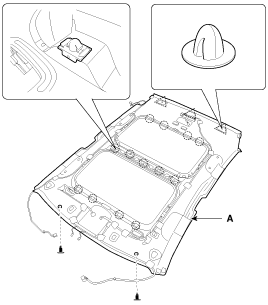
| 11. |
Installation is the reverse of removal.
|
 Roof Trim Components and Components Location
Components 1. Roof trim2. Sunvisor3. Retainer4. Assist handle bracket Components [Panoramaroof] 1. Roof trim2. Sunvisor3. Retainer4. Assist handle bracket ...
 Interior Trim Components and Components Location
Components 1. Front pillar trim2. Center pillar upper trim3. Center pillar lower trim4. Rear pillar trim5. Cowl side trim6. Front door scuff trim7. Rear door scuff trim8. Rear package tray trim ...
Other information:
Kia Optima Hybrid (TF HEV) 2016-2020 Service Manual: Engine Control Module (ECM) Schematic Diagrams
ECM Terminal And Input/Output signal ECM Terminal Function Connector [C100-K] PinNo.DescriptionConnected to1Power groundChassis Ground2Battery power (B+)Ignition Switch3Power groundChassis Ground4Battery power (B+)Main Relay5Power groundChassis Ground6Battery power (B+)Battery 7-8-?9Fuel Level Sender ...
Kia Optima Hybrid (TF HEV) 2016-2020 Service Manual: Head Lamp Leveling Actuator Repair procedures
Inspection with GDS Initialization and diagnosis sequence by using GDS equipment. Below content summarize the procedure for A/S using GDS. No.Procedure1Locate vehicle to flat plane2Tire check3IGN1 ON4Head lamp Low Beam ON5Connection with diagnostic tool6Initial command by diagnostic tool7Clear DTC Code8IGN1 ...