Kia Optima Hybrid: Keyless Entry And Burglar Alarm / Repair procedures
| Inspection |
| 1. |
Remove the front door trim.
(Refer to the BD group - "Front door") |
| 2. |
Remove the front door module. |
| 3. |
Disconnect the 7P connector from the actuator.
|
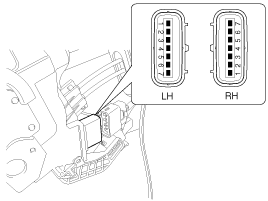
| 4. |
Check actuator operation by connecting power and ground
according to the table. To prevent damage to the actuator, apply battery
voltage only momentarily.
|
| 1. |
Remove the rear door trim.
(Refer to the BD group - "Rear door") |
| 2. |
Remove the rear door module. |
| 3. |
Disconnect the 7P connector from the actuator.
|

| 4. |
Check actuator operation by connecting power and ground
according to the table. To prevent damage to the actuator, apply battery
voltage only momentarily.
|
| 1. |
Remove the trunk lid trim panel.
(Refer to the BD group - "Trunk lid") |
| 2. |
Disconnect the 3P connector from the actuator.
|
| 3. |
Check actuator operation by connecting power and ground
according to the table. To prevent damage to the actuator, apply battery
voltage only momentarily.
|

| 1. |
Remove the front door trim panel.
(Refer to the BD group - "Front door") |
| 2. |
Remove the front door module. |
| 3. |
Disconnect the 7P connector from the actuator.
|
| 4. |
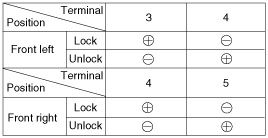
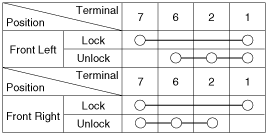
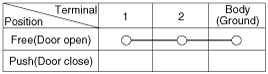
Check for continuity between the terminals in each switch position when inserting the key into the door according to the table.
|
| 1. |
Remove the rear door trim panel.
(Refer to the BD group - "Rear door") |
| 2. |
Remove the rear door module. |
| 3. |
Disconnect the 7P connector from the actuator.
|
| 4. |
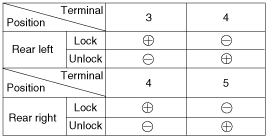
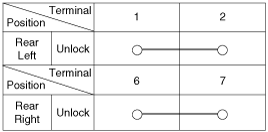
Check for continuity between the terminals in each switch position according to the table.
|
| 1. |
Remove the trunk lid trim.
(Refer to the BD group - "Trunk lid") |
| 2. |
Disconnect the connector from the actuator.
|
| 3. |
Check for continuity between the terminals in each switch position according to the table.
|

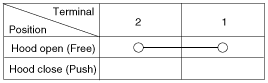
| 1. |
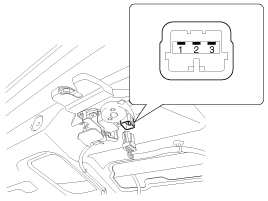
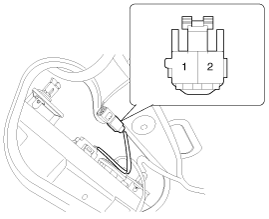
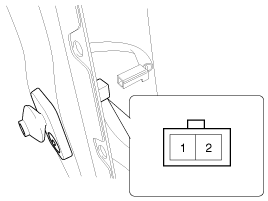
Disconnect the connector from the hood switch (A).
|
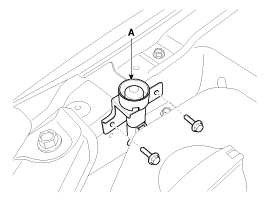
| 2. |
Check for continuity between the terminals and ground according to the table.
|
| 1. |
Remove the burglar horn (A) after removing 1 bolt and disconnect the connector from the burglar horn.
|
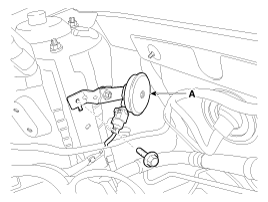
| 2. |
Test the burglar horn by connecting battery power to the terminal 1 and ground the terminal 2. |
| 3. |
The burglar horn should make a sound. If the burglar horn fails to make a sound replace it. |
 Description and Operation
Description Burglar Alarm State [B/A State] B/A StateDescriptionDISARM 1) In "DISARM" state, no vehicle start inhibition. So, when door, hood, or Tailgate is opened, there is no alarm sound and flashing. ...
 Transmitter Repair procedures
Inspection 1. Check that the red light flickers when the door lock or unlock button is pressed on the transmitter. 2. Remove the battery (A) and check voltage if the red light doesn''t flicker. Standard ...
Other information:
Kia Optima Hybrid (TF HEV) 2016-2020 Service Manual: Special Service Tools
Special Service Tools Tool Name / NumberIllustrationDescriptionBand installer09495 - 39100Installation of hook type boot band.Band installer09495 - 3K000Installation of ear type boot bandLower arm ball joint remover0K545-A9100Removal of front lower arm from front axle Personal Protective Equipment NameIllustrationDescriptionInsulation ...
Kia Optima Hybrid (TF HEV) 2016-2020 Service Manual: Airbag Module Disposal Description and Operation
Airbag Disposal Special tool required Deployment tool 0957A-34100A Before scrapping any airbags or side airbags (including those installed in vehicle to be scrapped), the airbags or side airbags must be deployed. If the vehicle is still within the warranty period, before deploying the airbags or side ...