Kia Optima Hybrid: Rear Suspension System / Rear Upper Arm Repair procedures
| Replacement |
| 1. |
Remove the rear wheel & tire.
|


| 2. |
Loosen the bolt & nut and then remove the rear upper arm (A) from the rear axle.
|
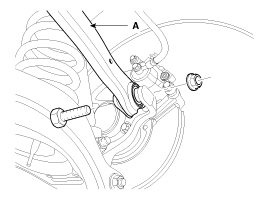
| 3. |
Loosen the bolt & nut and then remove the rear upper arm (A) from the sub frame.
|
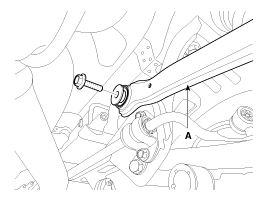
| 4. |
Installation is the reverse of removal.
|
| Inspection |
| 1. |
Check the bushing for wear and deterioration. |
| 2. |
Check the rear lower arm for deformation. |
| 3. |
Check the coil spring and spring pad for deterioration and deformation. |
| 4. |
Check for all bolts and nut. |
 Rear Shock Absorber Repair procedures
Replacement 1. Remove the rear wheel & tire. Tightening torque: 88.3 ~ 107.9N.m(9.0 ~ 11.0kgf.m, 65.1 ~ 79.6lb-ft) Be careful not to damage the hub bolts when removing the rear wheel ...
 Rear Lower Arm Repair procedures
Replacement 1. Remove the rear wheel & tire. Tightening torque: 88.3 ~ 107.9N.m(9.0 ~ 11.0kgf.m, 65.1 ~ 79.6lb-ft) Be careful not to damage the hub bolts when removing the rear wheel ...
Other information:
Kia Optima Hybrid (TF HEV) 2016-2020 Service Manual: Photo Sensor Repair procedures
Inspection 1. Ignition "ON" 2. Using the scan tool. 3. Emit intensive light toward photo sensor using a lamp, and check the output voltage change. 4. The voltage will rise with higher intensive light and reduce with lower intensive light. 1. Auto Light Signal2. Auto Light Signal Signal3. Photo Signal ...
Kia Optima Hybrid (TF HEV) 2016-2020 Service Manual: Head Lamp Leveling Actuator Repair procedures
Inspection with GDS Initialization and diagnosis sequence by using GDS equipment. Below content summarize the procedure for A/S using GDS. No.Procedure1Locate vehicle to flat plane2Tire check3IGN1 ON4Head lamp Low Beam ON5Connection with diagnostic tool6Initial command by diagnostic tool7Clear DTC Code8IGN1 ...