Kia Optima Hybrid: Power Windows / Power Window Switch Repair procedures
| Inspection |
| 1. |
Disconnect the negative (-) battery terminal. |
| 2. |
Remove the front door trim panel.
(Refer to the BD group - "Front door") |
| 3. |
Disconnect the connector from the switch.
|
| 4. |
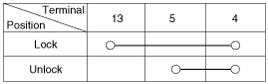
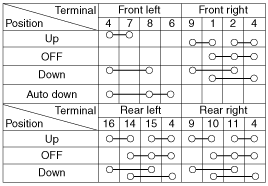
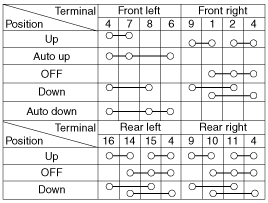
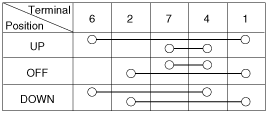
Check for continuity between the terminals in each switch
position according to the table. If the continuity condition is not
normal, replace the switch.
[Auto Down]
[Safety Up/Down]
|
| 1. |
Disconnect the negative (-) battery terminal. |
| 2. |
Remove the front door trim panel.
(Refer to the BD group - "Front door") |
| 3. |
Disconnect the connector from the switch.
|
| 4. |
Check for continuity between the terminals in each switch
position according to the table. If the continuity condition is not
normal, replace the switch.
|
| 1. |
Disconnect the negative (-) battery terminal. |
| 2. |
Remove the rear door trim panel.
(Refer to the BD group - "Rear door") |
| 3. |
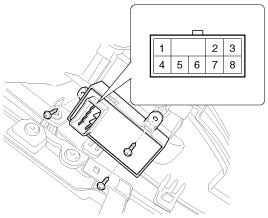
Disconnect the 8P connector from the switch.
|

| 4. |
Check for continuity between the terminals in each switch
position according to the table. If the continuity condition is not
normal, replace the switch.
|

 Power Window Switch Schematic Diagrams
Circuit Diagram Driver Power Window Switch (1) Driver Power Window Switch (2) [Auto Down] [Safety Up/Down] Passenger And Rear Power Window Switch Rear Power Window + Seat Heater Switch ...
 Power Window Relay Repair procedures
Inspection Diagnosis With GDS 1. It will be able to diagnose defects of power window with GDS quickly. GDS can operates actuator forcefully, input/output value monitoring and self diagnosis. 2. Select ...
Other information:
Kia Optima Hybrid (TF HEV) 2016-2020 Service Manual: ETC (Electronic Throttle Control) System Specifications
Specification [Throttle Position Sensor (TPS)] Throttle Angle(°)Output Voltage(V)TPS1TPS200.05.0100.484.52200.954.05301.433.57401.903.10502.382.62602.862.14703.331.67803.811.19904.290.711004.760.241055.00C.T (6 ~ 15°)0.29 ~ 0.714.29 ~ 4.71W.O.T (93 ~ 102°)4.43 ~ 4.860.14 ~ 0.57 ItemSensor Resistance(k?)TPS10.875 ...
Kia Optima Hybrid (TF HEV) 2016-2020 Service Manual: NVLD(Natural Vacuum Leakage Detection) Description and Operation
Description NVLD(Natural Vacuum Leakage Detection) is located between the canister and the fuel tank air filter. NVLD is to detect leaks equivalent to a 0.5 mm hole in the fuel tank, canister and hoses. When the engine has been running, the temperature of the fuel in the fuel tank is raised slightly. ...