Kia Optima Hybrid: Blower / Intake Actuator Repair procedures
| Inspection |
| 1. |
Ignition "OFF". |
| 2. |
Disconnect the intake actuator connector. |
| 3. |
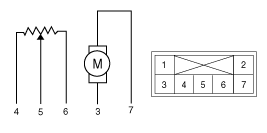
Verify that the actuator operates to the recirculation position when connecting 12V to the terminal 3 and grounding terminal 7. |
| 4. |
Verify that the intake actuator operates to the fresh position when connecting in the reverse.
|
| 5. |
If the intake actuator is not operated well, substitute with a known-good intake actuator and check for proper operation. |
| 6. |
If the problem is corrected, replace the intake actuator. |
| Replacement |
| 1. |
Disconnect the negative (-) battery terminal. |
| 2. |
Remove the crash pad.
(Refer to BD group - "Crash Pad") |
| 3. |
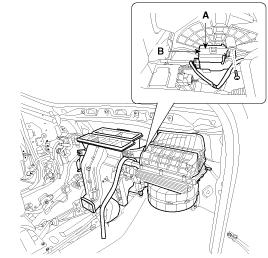
Disconnect the Intake actuator connector (A) |
| 4. |
Loosen the mounting screw and then remove the intake actuator (B).
|
| 5. |
Installation is the reverse order of removal. |
 Intake Actuator Description and Operation
Description 1. The intake actuator is located at the blower unit. 2. It regulates the intake door by signal from control unit. 3. Pressing the intake selection switch will shift between recirculation and ...
 Controller
...
Other information:
Kia Optima Hybrid (TF HEV) 2016-2020 Service Manual: Troubleshooting
Troubleshooting Vehicle inspection SYMPTOM CHART SymptomSuspect AreaRemedy (See page)Squeak or grunt-noise from the front suspension, occurs more in cold ambient temperatures-more noticeable over rough roads or when turningFront stabilizer barUnder these conditions, the noise is acceptable.Clunk-noise ...
Kia Optima Hybrid (TF HEV) 2016-2020 Service Manual: Parking Assist Sensor Repair procedures
Removal 1. Disconnect the negative (-) battery terminal. 2. Remove the front/rear bumper. (Refer to Body - "Front Bumper cover") (Refer to Body - "Rear Bumper cover") 3. Disconnect the connector (A) from the sensor. [Front] [Rear] 4. Pull out the sensor (A) by opening the sensor holder (B) out. [Front] ...


