Kia Optima Hybrid: Heater / Heater Unit Components and Components Location
Kia Optima Hybrid (TF HEV) 2016-2020 Service Manual / Heating,Ventilation, Air Conditioning / Heater / Heater Unit Components and Components Location
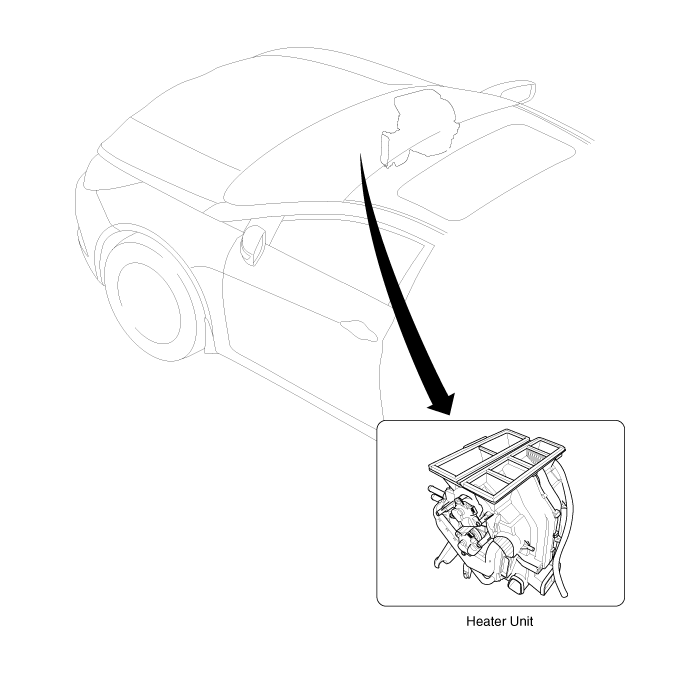
| Component Location |
| Components |
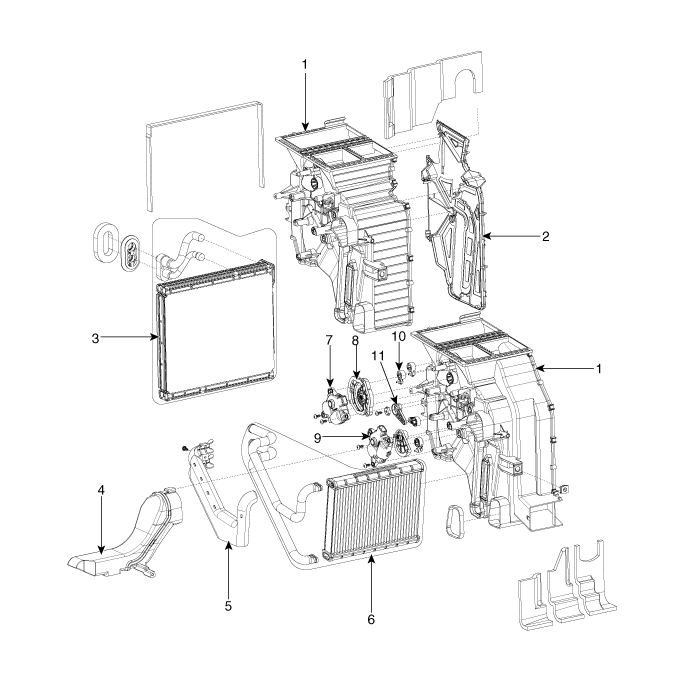
| 1. Heater Case (LH) 2. Separator 3. Evaporator Core 4. Shower Duct | 5. Heater Core Cover 6. Heater Core 7. Mode Actuator 8. Mode Cam | 9. Temp Actuator 10. Vent Door Arm 11. Floor Door Arm |

| 1. Heater Case (RH) 2. Temp Actuator (PA) 3. Temp Door Lever 4. Evaporator Temp Sensor | 5. Hearer Lower Caver 6. Drain Hose 7. Separator 8. Insulator | 9. Temp Control Door 10. Floor Door 11. Vent Door 12. Def Door |
 Heater
...
 Heater Unit Repair procedures
Replacement 1. Disconnect the negative (-) battery terminal. 2. Recover the refrigerant with a recovery/ recycling/ charging station. 1) Do not use the same A/C recovery / charging station ...
Other information:
Kia Optima Hybrid (TF HEV) 2016-2020 Service Manual: Electric Oil Pump (EOP) Specifications
Specifications PumpPumping capacityAbout 6.46cc per one revolutionTypeInternal gearMotorType Brushless DC motor (3 phases)Torque Rated 1.5 N.mSpeed range100~2,500 rpm ...
Kia Optima Hybrid (TF HEV) 2016-2020 Service Manual: Components and Components Location
Components Location 1. Fuel Tank2. Fuel Pump3. Fuel Filter4. Fuel Pressure Regulator5. Canister6. Auxiliary Canister7. Fuel Tank Air Filter8. Fuel Tank Band9. Fuel Filler Hose10. Natural Vacuum Leakage Detection (NVLD)11. Fuel Level Sender (FLS)12. Ventilation Hose13. Vapor Tube14. Fuel Pump Plate Cover ...
© 2025 Copyright www.koptimatfhev.com