Kia Optima Hybrid: Electro chromic Inside Rear View Mirror / Compass Mirror Repair procedures
| Calibration Procedure |
| • |
The display read "C". |
| • |
The compass headings become inaccurate. |
| • |
The compass heading is not changed. |
| • |
Some compass headings are not displayed. |
| • |
The compass headings are inaccurate in long distance driving. |
| 1. |
Move the vehicle from the large steel structure or electric power supply cable. |
| 2. |
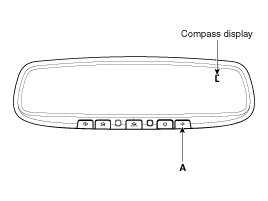
Turn on the compass by pressing the A button. |
| 3. |
Check the zone number by pressing the A button for more than 4 seconds until the current zone number appears in the display.
To re-calibrate, hold the A button for 3 seconds until C is
displayed. If the zone number is different for your country, set the
correct zone number referring to "Setting the compass zone" and do the
"calibration procedure" again. |
| 4. |
Drive your vehicle in at least 2 circles at less than 5 miles
per hour (8 km/h) until the compass heading appears. Driving in a
circle in right-handed direction and opposite direction is possible and
if possible, stops the wiper operation. |
| 5. |
If the vehicle''s compass headings become inaccurate as before, do the following procedure again.
|

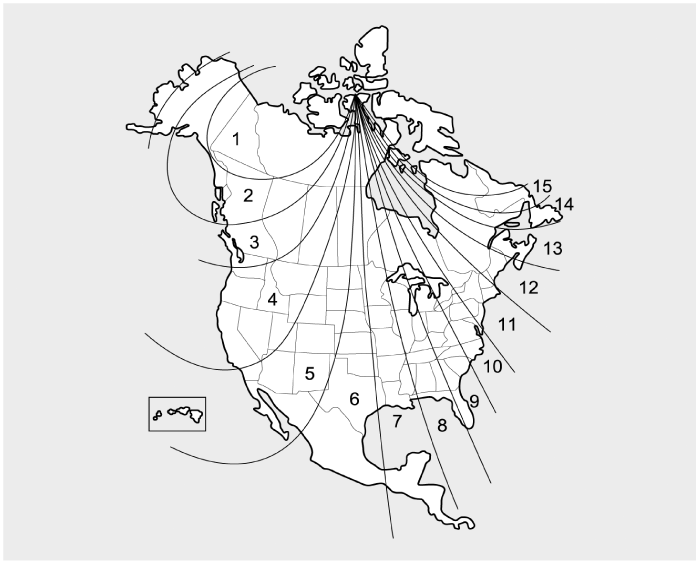
| 1. |
Find your current location and variance zone number on the zone map. |
| 2. |
Press the A button for more than 4 seconds. The current zone number will appear in the display. |
| 3. |
Release and press the A button until the new zone number
appears in the display. After you stop pressing the button in, the
display will show a compass direction within a few seconds.
|
|

 Compass Mirror Description and Operation
Function 1. Push the A button lower of the rear view mirror to turn on the function of the compass mirror so that displays a sign of a direction on the small board in the upper-right side of the mirror. ...

Other information:
Kia Optima Hybrid (TF HEV) 2016-2020 Service Manual: Multimedia jack Description and Operation
Description The multimedia jack on the console upper cover is for customers who like to listen to external portable music players like the MP3, iPod and etc., through the vehicle''s sound system when it is linked to this jack. The customer has this added option. In case of distortions from media connected ...
Kia Optima Hybrid (TF HEV) 2016-2020 Service Manual: Audio Unit Components and Components Location
Components Connector Pin Information Pin No.Connector A (18pin)Connector B (24pin)1Rear left speaker (+)-2Front left speaker (+)-3Front right speaker (+)-4Rear right speaker (+)Steering remocon5--6-USB D (+)7-USB/iPod VDD8Illumination (+)AUX right input9DetentAUX ground10Rear left speaker (-)MIC (+) ...