Kia Optima Hybrid: AHB(Active Hydraulic Boost) System / Brake Pedal Repair procedures
Kia Optima Hybrid (TF HEV) 2016-2020 Service Manual / Brake System / AHB(Active Hydraulic Boost) System / Brake Pedal Repair procedures
| Removal |
| 1. |
Turn ignition switch OFF and disconnect the negative (-) battery cable. |
| 2. |
Remove the crash pad lower panel and reinforcing panel. (Refer to the Body group - crash pad) |
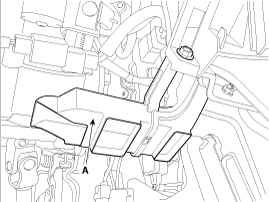
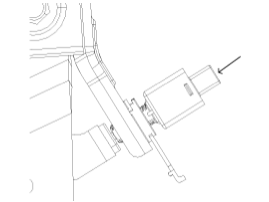
| 3. |
Remove the shower duct (A).
|
| 4. |
Pull down steering column shaft after removing bolts and nuts. (Refer to the steering group - Steering columm & shaft) |
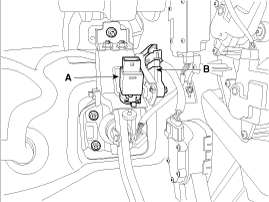
| 5. |
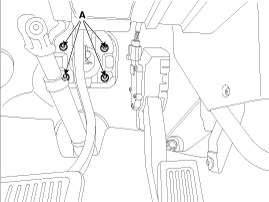
Disconnect the stop lamp switch connector (A) and the brake pedal stroke sensor connector (B).
|
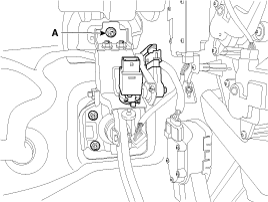
| 6. |
Remove the brake pedal member mounting nut (A).
|
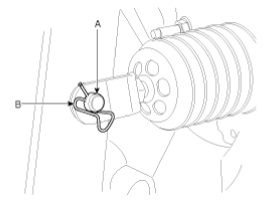
| 7. |
Remove the snap pin (A) and clevis pin (B).
|
| 8. |
Remove the brake pedal member assembly mounting nuts (A) and then remove the brake pedal assembly.
|
| Installation |
| 1. |
Installation is the reverse of removal. |
| 2. |
Check the brake pedal operation. |
| 3. |
Conduct calibration after removing the brake pedal assembly. |
Brake pedal sensor Calibration
The brake pedal sensor calculates the pedal full stroke
according to the preset zero. Therefore, zeroing adjustment is necessary
when first installed.Calibration must be performed as following cases.
| • |
After changing the brake pedal assembly (you cannot change only the sensor) |
| • |
After changing the BAU (Brake Actuation Unit) |
| • |
When error codes C1380 (calibration) or C1379 (signal error) are detected. |
| • |
After bleeding IBAU & PSU line. |
Calibration procedure
The calibration must be done while the vehicle is parked
without stepping on the brake pedal and while there is no vibration on
the vehicle.
| 1. |
Connect the GDS. (CAN line or OBD connector) |
| 2. |
Turn ignition switch ON. |
| 3. |
Select calibration of the brake pedal sensor. |
| 4. |
Follow prompts displayed on the GDS screen to complete brake pedal sensor calibration.
|
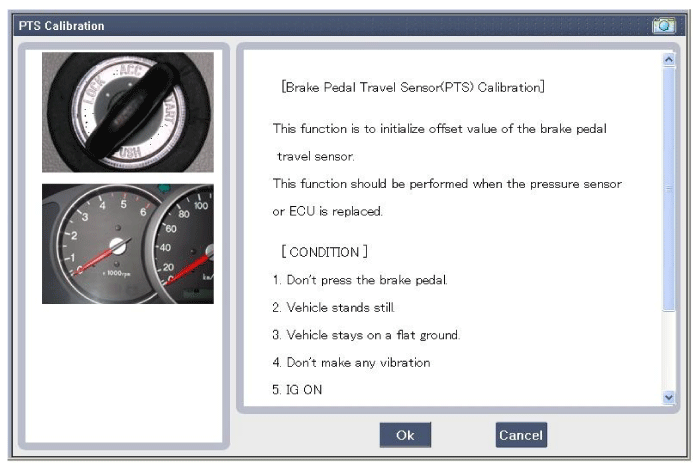
| 5. |
Turn ignition switch off after calibration procedure. |
| 6. |
Confirm success or failure of calibration. |
| Stop lamp switch clearance adjustment |
Removal
| 1. |
Turn ignition switch OFF and disconnect the negative (-) battery cable. |
| 2. |
Remove the crash pad lower panel and reinforcing panel. (Refer to the Body group - crash pad) |
| 3. |
Remove the shower duct (A).
|
| 4. |
Pull down steering column shaft after removing bolts and nuts. (Refer to the steering group - Steering columm & shaft) |
| 5. |
Disconnect the stop lamp switch connector (A) and the brake pedal stroke sensor connector (B).
|
| 6. |
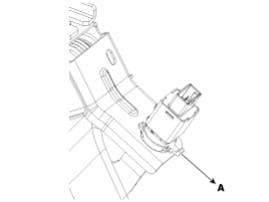
Pull the locking plate (A) as indicated by the arrow.
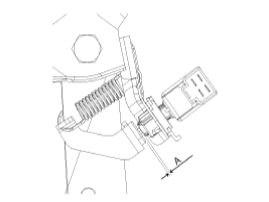
|
| 7. |
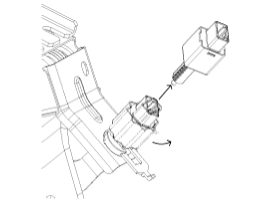
Turn stop lamp switch 45° counterclockwise and remove it.
|
Installation
| 1. |
Hold the brake pedal arm and insert the stop lamp switch fully.
|
| 2. |
After inserting, turn the stop lamp switch 45° clockwise; then, finish to assemble it by pushing the locking plate. |
| 3. |
Check the gap between stop lamp switch and bracket.
|

| 4. |
Connect the stop lamp switch connector. |
| 5. |
Following installation is the reverse of removal. |
 Brake Pedal Components and Components Location
Components 1. Brake pedal stroke sensor2. Stop lamp switch3. Brake pedal ...
 Front Disc Brake Components and Components Location
Components 1. Guide rod bolt2. Bleed screw3. Caliper carrier4. Caliper body5. Inner pad shim6. Brake pad7. Pad retainer ...
Other information:
Kia Optima Hybrid (TF HEV) 2016-2020 Service Manual: TPMS Receiver Schematic Diagrams
Circuit Diagram Connector pin number Pin NO.DiscriptionRemark1-2-3ECU battery terminal4-5CAN_High6CAN_Low7-8-9Ground10-11-12-13-14-15-16-17-18Ignition ON19-20- ...
Kia Optima Hybrid (TF HEV) 2016-2020 Service Manual: Cylinder Block Components and Components Location
Components 1. Piston ring2. Piston3. Connecting rod 4. Connecting rod upper bearing5. Piston pin6. Connecting rod lower bearing7. Connecting rod bearing cap8. Ladder frame9. Oil filter bracket10. Crankshaft rear oil seal 1. Crankshaft upper bearing2. Thrust bearing3. Crankshaft4. Crankshaft lower bearing5. ...
© 2025 Copyright www.koptimatfhev.com