Kia Optima Hybrid: Button Engine Start System / Start/Stop Button Repair procedures
Kia Optima Hybrid (TF HEV) 2016-2020 Service Manual / Body Electrical System / Button Engine Start System / Start/Stop Button Repair procedures
| Removal |
| 1. |
Disconnect the negative (-) battery terminal. |
| 2. |
Using a screwdriver or remover, remove the crash pad side cover (A). |
| 3. |
After loosening the mounting screws, then remove the crash pad lower panel (A). |
| 4. |
Disconnect the crash pad lower switch connectors (A), diagnosis connector (B), crash pad under lamp connector (C).
[LH]
|
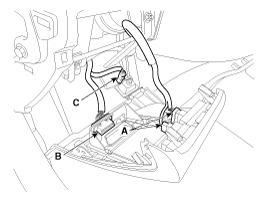
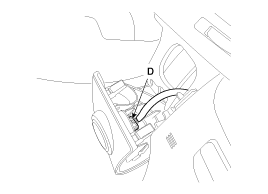
| 5. |
Disconnect the start/stop button connector (D).
[RH]
|
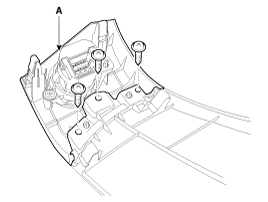
| 6. |
Remove the start/stop button (A) from the lower panel after loosening the mounting screws.
|
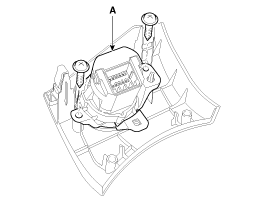
| 7. |
Remove the start/stop (A) after loosening the mounting screws.
|
| Installation |
| 1. |
Install the start/stop button. |
| 2. |
Install the crash pad lower panel. |
 Start/Stop Button Components and Components Location
Component ...

Other information:
Kia Optima Hybrid (TF HEV) 2016-2020 Service Manual: Intake Air Temperature Sensor (IATS) Description and Operation
Description Intake Air Temperature Sensor (IATS) is included inside Manifold Absolute Pressure Sensor and detects the intake air temperature. To calculate precise air quantity, correction of the air temperature is needed because air density varies according to the temperature. So the ECM uses not only ...
Kia Optima Hybrid (TF HEV) 2016-2020 Service Manual: Flow Diagram
Power Flow Chart P,NUD/BLR/B26/B35R/COD/COWCE/C?????? ? Direction of Rotation ?Lower & Reverse Brake (LR/B) Activation > Overdrive (O/D) Hub Lock > Mid & Rear P/C Lock ?Input Shaft Rotation > Rear Sun Gear Rotation > Rear Inner Pinion Rotation (Reverse) > Rear Outer Pinion Rotation > Rear Annulus ...
© 2025 Copyright www.koptimatfhev.com