Kia Optima Hybrid: Power Windows / Power Window Motor Repair procedures
| Inspection |
| 1. |
Remove the front door trim panel.
(Refer to the BD group - "Front door") |
| 2. |
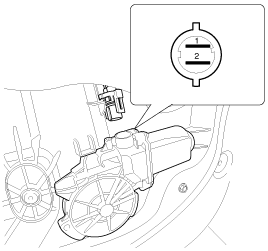
Disconnect the connector from the motor.
|
| 3. |
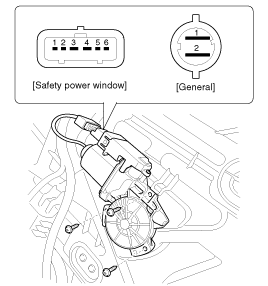
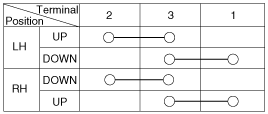
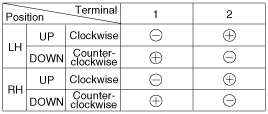
Connect the motor terminals No.2 and No.3 directly to battery voltage (12V) and check that the motor operates smoothly.
If the operation is abnormal, replace the motor.
[Safety Power Window]
|
| 4. |
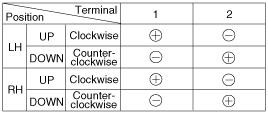
Connect the motor terminals directly to battery voltage (12V)
and check that the motor operates smoothly. Next, reverse the polarity
and check that the motor operates smoothly in the reverse direction. If
the operation is abnormal, replace the motor.
|
| 1. |
Remove the rear door trim panel.
(Refer to the BD group - "Rear door") |
| 2. |
Disconnect the 2P connector from the motor.
|
| 3. |
Connect the motor terminals directly to battery voltage (12V)
and check that the motor operates smoothly. Next, reverse the polarity
and check that the motor operates smoothly in the reverse direction. If
the operation is abnormal, replace the motor.
|
 Power Window Motor Schematic Diagrams
Circuit Diagram ...
 Power Window Switch Schematic Diagrams
Circuit Diagram Driver Power Window Switch (1) Driver Power Window Switch (2) [Auto Down] [Safety Up/Down] Passenger And Rear Power Window Switch Rear Power Window + Seat Heater Switch ...
Other information:
Kia Optima Hybrid (TF HEV) 2016-2020 Service Manual: Turn Signal Lamp Repair procedures
Removal Door Mirror Turn Signal Lamp 1. Disconnect the negative (-) battery terminal. 2. Remove the mirror (C) after disconnecting the heater connector (A) and BSD warning connector (B). 3. Remove the door mirror housing (A) after loosening the mounting screw. Take care not to damage the ...
Kia Optima Hybrid (TF HEV) 2016-2020 Service Manual: General Safety Information and Caution
Safety Precaution Since hybrid vehicles contain a high voltage battery, if the high voltage system or vehicles are handled incorrectly, this might lead to a serious accidents like electric shock and electric leakage. • Be sure to shut off the high voltage by removing the ...