Kia Optima Hybrid: Parking Brake System / Electric Parking Brake (EPB) Schematic Diagrams
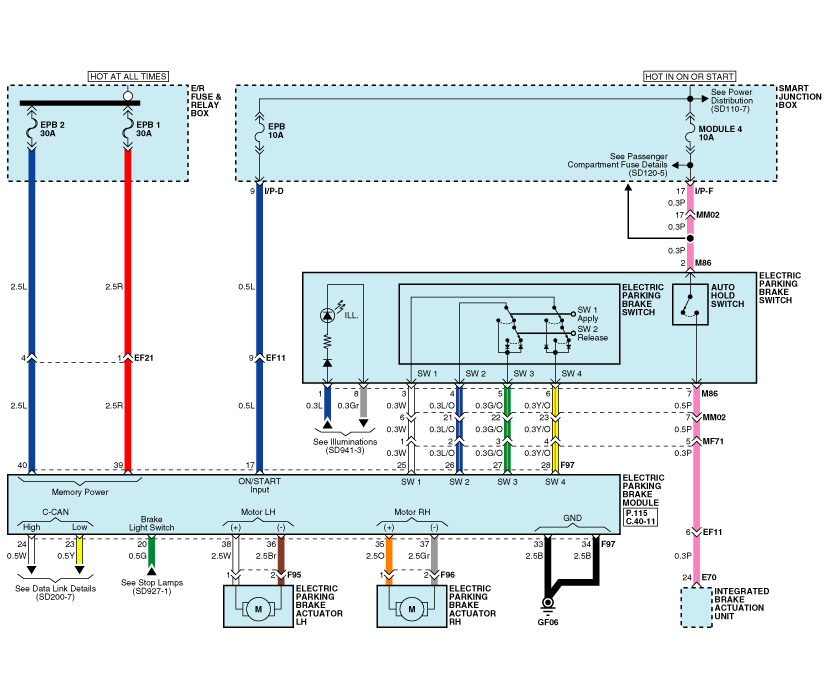
| EPB Circuit Diagram (1) |
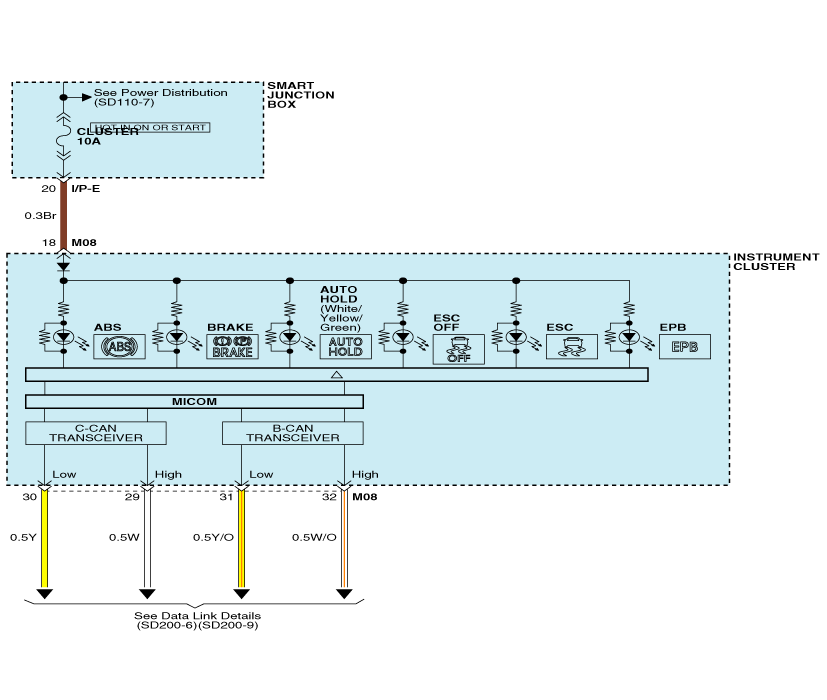
| EPB Circuit Diagram (2) |
| EPB connector input/output |
| Pin | Description | Pin | Description | ||
| 1 | - | - | 21 | - | - |
| 2 | - | - | 22 | Y | C-CAN (Low) |
| 3 | - | - | 23 | W | C-CAN (High) |
| 4 | - | - | 24 | W | Electric Parking Brake Switch (SW1) |
| 5 | - | - | 25 | L/O | Electric Parking Brake Switch (SW2) |
| 6 | - | 26 | G/O | Electric Parking Brake Switch (SW3) | |
| 7 | - | - | 27 | Y/O | Electric Parking Brake Switch (SW4) |
| 8 | - | - | 28 | - | - |
| 9 | - | 29 | - | - | |
| 10 | - | - | 30 | - | - |
| 11 | - | - | 31 | - | - |
| 12 | - | - | 32 | - | - |
| 13 | - | - | 33 | B | Ground (GF06) |
| 14 | - | - | 34 | B | Ground (GF06) |
| 15 | - | - | 35 | O | Electric Parking Brake ActuatorRH (+) |
| 16 | - | 36 | Br | Electric Parking Brake ActuatorLH (-) | |
| 17 | L | Smart Junction Box (Fuse - EPB) | 37 | Gr | Electric Parking Brake ActuatorRH (-) |
| 18 | - | - | 38 | W | Electric Parking Brake ActuatorLH (+) |
| 19 | - | - | 39 | R | E/R Fuse & Relay Relay(FUSE - EPB 1) |
| 20 | G | Brake Light Switch | 40 | L | E/R Fuse & Relay Relay(FUSE - EPB 2) |
 Electric Parking Brake (EPB) Description and Operation
Description Description of EPB The EPB is an electronic parking brake. The EPB is different from existing parking systems which operated with the brake pedal or the lever type. The EPB system sends the ...
 Electric Parking Brake (EPB) Repair procedures
Removal EPB Unit 1. Turn ignition OFF and disconnect the negative (-) battery cable. 2. Disconnect the EPB control unit connecter (A). 3. Remove the EPB control unit mounting nuts (B) and the EPB control ...
Other information:
Kia Optima Hybrid (TF HEV) 2016-2020 Service Manual: Exhaust Manifold Repair procedures
Removal and Installation 1. Remove the engine cover. 2. Disconnect the battery negative terminal. Tightening torque: 4.0 ~ 6.0N.m (0.4 ~ 0.6kgf.m, 3.0 ~ 4.4lb-ft) 3. Disconnect the oxygen sensor connectors (A). 4. Remove the front muffler (A). Tightening torque: 39.2 ~ 58.8 N.m (4.0 ~ 6.0 kgf.m, 28.9 ...
Kia Optima Hybrid (TF HEV) 2016-2020 Service Manual: Hands Free Mic Repair procedures
Inspection 1. Disconnect the negative(-) battery terminal. 2. Remove the roof trim. (Refer to the BD group - "Roof trim") 3. Remove the handsfree mic (A) after disconnect the connector from loof top. Be careful not to damage the roof trim when removing the hands free mic. Do not reuse the ...