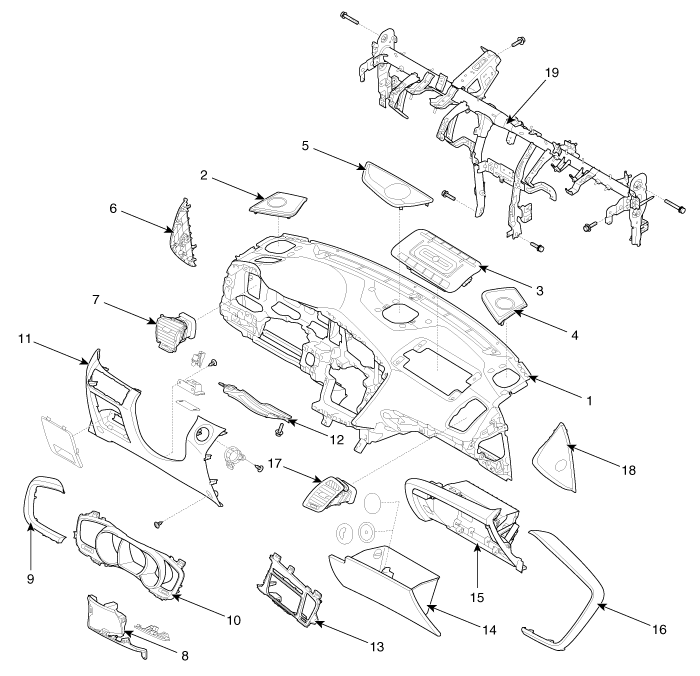
Kia Optima Hybrid: Interior / Crash Pad Components and Components Location
| Components |

| 1. Main crash pad assembly 2. Side speaker grille [LH] 3. Airbag blanking cover 4. Side speaker grille [RH] 5. Center speaker grille 6. Crash pad side cover [LH] 7. Side air vent duct [LH] | 8. Center facia lower panel 9. Crash pad garnish [LH] 10. Cluster fascia panel 11. Crash pad lower panel 12. Reinforcing panel 13. Center facia upper panel 14. Glove box | 15. Glove box housing 16. Crash pad garnish [RH] 17. Side air vent duct [RH] 18. Crash pad side cover [RH] 19. Cowl cross bar assembly |
 Console Repair procedures
Replacement Floor Console Replacement • When prying with a flat-tip screwdriver, wrap it with protective tape, and apply protective tape around the related parts, to prevent damage. • ...
 Crash Pad Repair procedures
Replacement Cluster Replacement • When prying with a flat-tip screwdriver, wrap it with protective tape, and apply protective tape around the related parts, to prevent damage. • Put on ...
Other information:
Kia Optima Hybrid (TF HEV) 2016-2020 Service Manual: Purge Control Solenoid Valve (PCSV) Description and Operation
Description Purge Control Solenoid Valve (PCSV) is installed on the surge tank and controls the passage between the canister and the intake manifold. It is a solenoid valve and is open when the ECM grounds the valve control line. When the passage is open (PCSV ON), fuel vapor stored in the canister is ...
Kia Optima Hybrid (TF HEV) 2016-2020 Service Manual: Components and Components Location
Component Location 1. Start Stop Button(SSB)2. FOB key3. Trunk lid open switch4. Smart key unit5. RF receiver6. Body control module7. Interior antenna 18. Interior antenna 29. Trunk antenna10. Door handle & door antenna11. Bumper antenna ...
