Remove the timing chain. (Refer to Timing system in this group)
2.
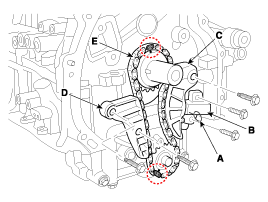
Install a stopper pin (A) after compressing the balance shaft chain tensioner.
3.
Remove the balance shaft chain hydraulic tensioner (B).
4.
Remove the balance shaft chain tensioner arm (C).
5.
Remove the balance shaft chain guide (D).
6.
Remove the balance shaft chain (E).
7.
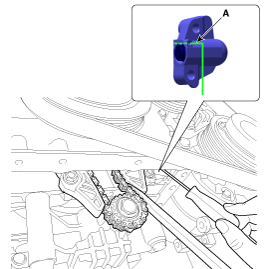
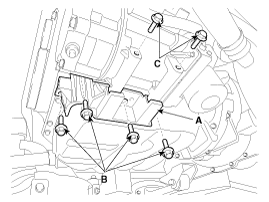
Remove the balance shaft module (BSM) (A) after removing the balance shaft module (BSM) mounting bolts.
Do not disassemble the balance shaft module (BSM).
Balance Shaft Module (BSM)
1.
Remove the engine room under cover.
2.
Remove the RH front wheel.
3.
Drain the engine oil.
4.
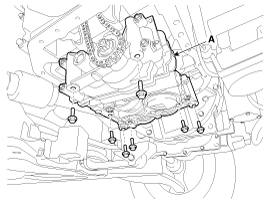
Remove the A/C compressor bracket (A).
5.
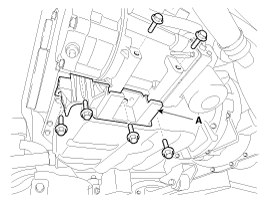
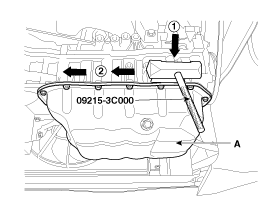
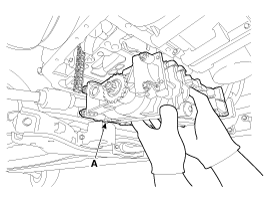
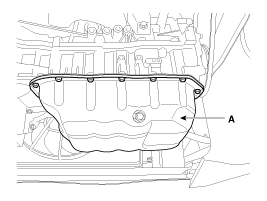
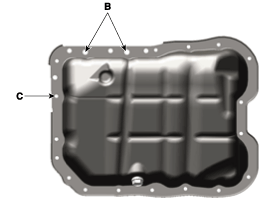
Remove the oil pan (A). Insert the blade of SST (09215-3C000)
between the ladder frame and oil pan. Cut off applied sealer and remove
the lower oil pan.
•
Insert the SST between the oil pan and the ladder frame by tapping it with a plastic hammer in the direction of arrow.
•
After tapping the SST with a plastic hammer along the direction of arrow around more than 2/3 edge of the oil pan, remove it from the ladder frame.
•
Do not turn over the SST abruptly without tapping. It is result in damage of the SST.
•
Be careful not to damage the contact surfaces of ladder frame and lower oil pan.
6.
Set No.1 cylinder to TDC/compression.
(1)
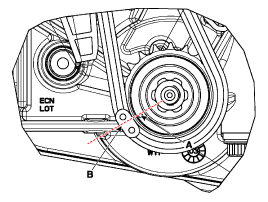
Turn the crankshaft pulley and align its groove with the timing mark of the timing chain cover.
(2)
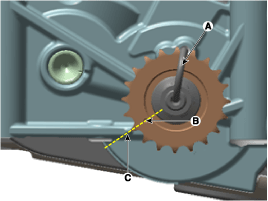
Confirm that the sprocket timing mark (A) is visually aligned
with center of adjacent cast timing notch (B) and the drive shaft
timing mark (C) is visually aligned with the housing timing mark (D).
7.
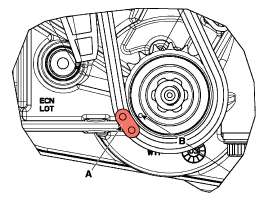
Mark on the timing chain (A) corresponding to the timing mark (B) of the sprocket.
8.
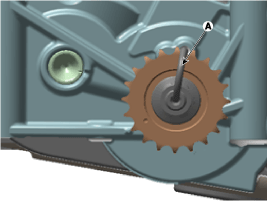
Insert a stopper pin (A) into the hole on the tensioner after compressing the balance shaft chain tensioner piston.
9.
Remove the balance shaft module (BSM) (A) mounting bolts.
10.
Remove the balance shaft module (BSM) (A) while taking off the chain from the sprocket.
Do not disassemble the balance shaft module (BSM).
Installation
Balance Shaft Module (BSM) Chain System
1.
The key of crankshaft should be aligned with the mating face
of main bearing cap. As a result of this, the piston of No.1 cylinder is
placed at the top dead center on compression stroke.
2.
Insert a stopper pin (A) on the balance shaft module (BSM) to
hold the sprocket at the reference position with the timing mark (B, D)
aligned with the timing notch (C, E).
New balance shaft module (BSM) has already been installed with a stopper pin at the reference position.
3.
Install the balance shaft module (BSM).
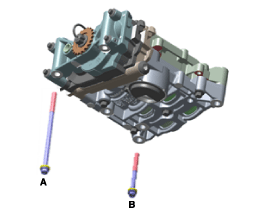
(1)
Tighten the bolts with seating torque 26.4 N.m (3.0kgf.m, 21.7 lb-ft) and then loosen the bolts.
(2)
Using the SST (Torque Angle Adapter, 09221-4A000), tighten the bolts with specified tightening torgue and angle.
Do not reuse the Balance Shaft Module (BSM) bolts.
4.
Install the balance shaft chain (E).
The timing marks of balance shaft module (BSM) sprocket and
crankshaft sprocket should be matched with the timing marks (color link)
of balance shaft chain.
5.
Install the balance shaft chain guide (D).
Tightening torque :
9.8 ~ 11.8N.m (1.0 ~ 1.2kgf.m, 7.2 ~ 8.7lb-ft)
6.
Install the balance shaft chain hydraulic tensioner (B) then remove the stopper pin (A).
Tightening torque :
9.8 ~ 11.8N.m (1.0 ~ 1.2kgf.m, 7.2 ~ 8.7lb-ft)
7.
Install the balance shaft chain tensioner arm (C).
Tightening torque :
9.8 ~ 11.8N.m (1.0 ~ 1.2kgf.m, 7.2 ~ 8.7lb-ft)
8.
Remove the stopper pin (A) of balance shaft module (BSM).
9.
After rotating crankshaft 2 revolutions in regular direction
(clockwise viewed from front), confirm that the timing mark and notch
are aligned at the reference position.
10.
Install the timing chain. (Refer to Timing system in this group)
Balance Shaft Module (BSM)
1.
Insert a stopper pin (A) on the balance shaft module (BSM) to
hold the sprocket at the reference position with the timing mark (B, D)
aligned with the timing notch (C, E).
2.
Install the balance shaft module (BSM) (A).
The timing mark of balance shaft module (BSM) sprocket (A) should be matched with the paint-marked link (B) of the timing chain.
3.
Install the balance shaft module (BSM) Mounting bolts.
(1)
Tighten the bolts with seating torque 26.4 N.m (3.0kgf.m, 21.7 lb-ft) and then loosen the bolts.
(2)
Using the SST (Torque Angle Adapter, 09221-4A000), tighten the bolts with specified tightening torgue and angle.
Do not reuse the balance shaft module (BSM) bolts.
4.
Remove the stopper pin (A) from the balance shaft module (BSM).
5.
Remove the stopper pin (A) from the tensioner.
6.
Confirm the balance shaft module (BSM) timing mark.
(1)
Turn the crankshaft pulley and align its groove with the timing mark of the timing chain cover.
(2)
Confirm that the sprocket timing mark (A) is visually aligned
with center of adjacent cast timing notch (B) and the drive shaft
timing mark (C) is visually aligned with the housing timing mark (D).
7.
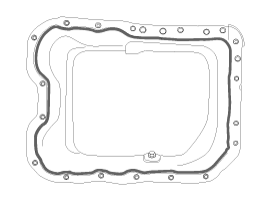
Install the oil pan.
(1)
Using a gasket scraper, remove all the old sealant material from the gasket surfaces.
(2)
Before assembling the oil pan, liquid sealant Loctite 5900H,
Threebond 1217H or equivalent should be applied on oil pan. The part
must be assembled within 5 minutes after sealant was applied.
Bead width : 2.5 mm (0.10 in.)
•
When applying sealant gasket, sealant must not be protruded into the inside of oil pan.
•
To prevent leakage of oil, apply sealant gasket on the inner threads of the bolt holes.
(3)
Install the oil pan (A). Uniformly tighten the bolts in several passes.
Inspection 1. Check the continuity between the terminal and the body with an ohmmeter. If there is no continuity, replace the oil pressure switch. 2. Check the continuity between the terminal and the body ...
High Voltage Shut-off Procedures Be sure to read and follow the “General Safety Information and Caution” before doing any work related with the high voltage system. Failure to follow the safety instructions may result in serious electrical injuries. • High voltage components: ...
Inspection 1. Check the hands free remote control switch for resistance between terminals in each switch position. [Audio/ Bluetooth] [Voice recognition] [Bluetooth] SwitchConnectorterminalResistance(±5%)Send2-718.91k?End of call2-740.91k? [Voice recognition] SwitchConnector terminalResistance(±5%)VoiceAudio/ ...

 arrow.
  arrow around more than 2/3 edge of the oil pan, remove it from the ladder frame.
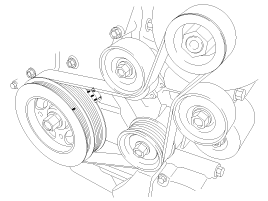
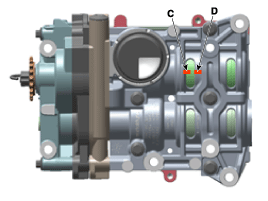


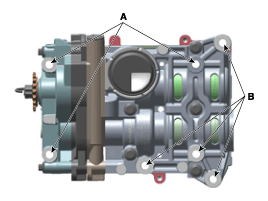

 Balance Shaft & Oil Pump Components and Components Location
 Oil Pressure Switch Repair procedures