Kia Optima Hybrid: Seat Belt Pretensioner / Anchor Pretensioner (APT) Repair procedures
Kia Optima Hybrid (TF HEV) 2016-2020 Service Manual / Restraint / Seat Belt Pretensioner / Anchor Pretensioner (APT) Repair procedures
| Removal |
| 1. |
Disconnect the battery negative cable, and wait for at least three minutes before beginning work. |
| 2. |
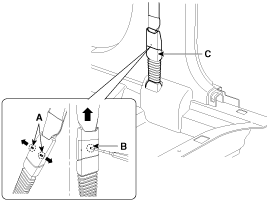
To remove the seat belt anchor pretensioner (C), keep on
pushing the lock pin (A) as arrow direction. And then remove the seat
belt after pushing the lock pin (B).
|
| 3. |
Remove the door scuff trim. (Refer to the Body group- Interior trim) |
| 4. |
Remove the center pillar trim. (Refer to the Body group- Interior trim) |
| 5. |
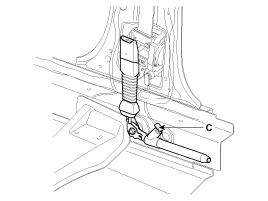
Disconnect the anchor pretensioner connector (C).
|
| 6. |
Loosen the anchor pretensioner mounting bolt and remove the anchor pretensioner. |
| Installation |
| 1. |
Remove ignition key from the vehicle. |
| 2. |
Disconnect the negative (-) cable from battery and wait for at least three minutes. |
| 3. |
Install the anchor pretensioner with a bolt.
|
| 4. |
Connect the anchor pretensioner connector. |
| 5. |
Install the center pillar trim. (Refer to the Body group- Interior trim) |
| 6. |
Install the door scuff trim. (Refer to the Body group- Interior trim) |
| 7. |
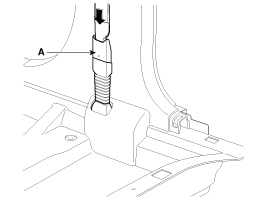
Insert the seat belt to the anchor pretensioner (A).
|
| 8. |
Reconnect the battery negative cable. |
| 9. |
After installing the anchor pretensioner, confirm proper system operation:
|
 Anchor Pretensioner (APT) Components and Components Location
Components ...
 Brake System
...
Other information:
Kia Optima Hybrid (TF HEV) 2016-2020 Service Manual: Description and Operation
Description Exhaust emissions (CO, HC, NOx) are controlled by a combination of engine modifications and the addition of special control components. Modifications to the combustion chamber, intake manifold, camshaft and ignition system form the basic control system. These items have been integrated into ...
Kia Optima Hybrid (TF HEV) 2016-2020 Service Manual: Head Lamp Leveling Actuator Repair procedures
Inspection with GDS Initialization and diagnosis sequence by using GDS equipment. Below content summarize the procedure for A/S using GDS. No.Procedure1Locate vehicle to flat plane2Tire check3IGN1 ON4Head lamp Low Beam ON5Connection with diagnostic tool6Initial command by diagnostic tool7Clear DTC Code8IGN1 ...
© 2025 Copyright www.koptimatfhev.com


