Kia Optima Hybrid: Parking Brake System / Parking Brake Assembly Repair procedures
| Removal |
| 1. |
Turn ignition OFF and disconnect the negative (-) battery cable. |
| 2. |
Remove the crash pad lower panel and reinforcing panel. (Refer to the Body group - crash pad) |
| 3. |
Remove the junction box. (Refer to the Body Electrical System group - Fuses and Relays) |
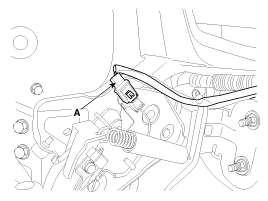
| 4. |
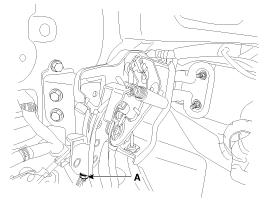
Disconnect the parking brake switch connector (A).
|
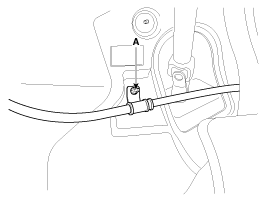
| 5. |
Remove the parking brake cable mounting nut (A).
|
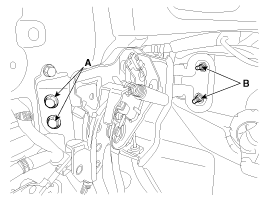
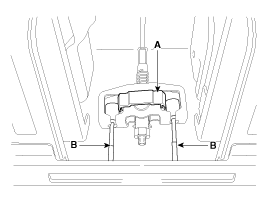
| 6. |
Remove the parking brake pedal mounting bolts (A) and nuts (B).
|
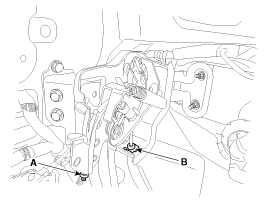
| 7. |
Remove the parking brake cable adjusting nut (A) and the fixing clip (B), and then remove the parking brake pedal.
|
| 8. |
Remove the floor console.
(Refer to the Body group - Console) |
| 9. |
Remove the shift lever assembly. (Refer to the Automatic Transaxle group - shift lever) |
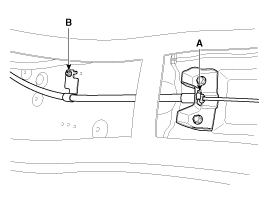
| 10. |
Remove the paring brake cable (B) after removing the cable retainer (A).
|
| 11. |
Remove the parking brake cable fixing clip (A) and bolts (B). And then remove the front parking brake cable.
|
| 12. |
Raise the vehicle, and make sure it is securely supported. |
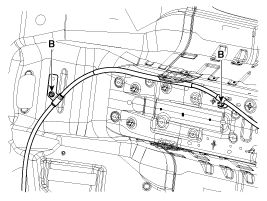
| 13. |
Remove the parking brake cable (B) after removing the fixing clip (A).
|
| 14. |
Loosen the parking brake cable bracket bolts and remove the rear parking brake cable.
|
| 1. |
Raise the vehicle, and make sure it is securely supported. |
| 2. |
Remove the rear tire and wheel. |
| 3. |
Remove the rear brake caliper and Rear disc brake.
(Refer to "Rear disc brake removal") |
| 4. |
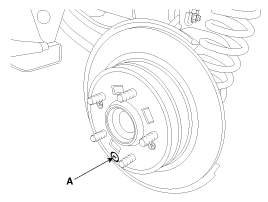
Remove the parking brake cable (B), after removing the fixing clip (A).
|
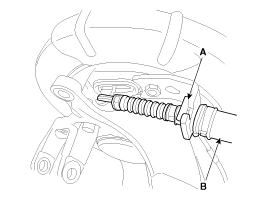
| 5. |
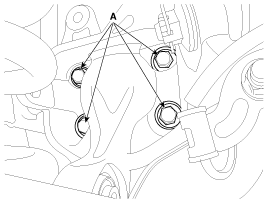
Loosen the hub assembly mounting bolts (A), and then remove the hub assembly and parking brake assembly.
|
| 6. |
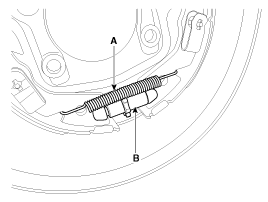
Remove the adjuster assembly (B) and the lower return spring (A).
|
| 7. |
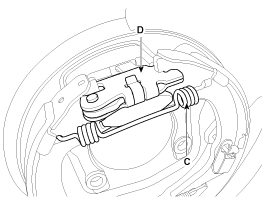
Remove the upper return spring (C) operating lever assembly (D).
|
| 8. |
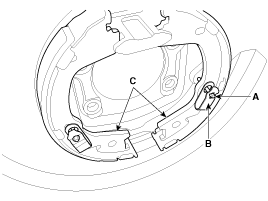
Remove the shoe hold down pin (A) and the spring (B) by pressing and rotating the spring.
|
| 9. |
Remove the brake shoes (C). |
| Installation |
| 1. |
Install the shoe hold down pin (A) and spring (B) by pressing and rotating the spring.
|
| 2. |
Install the operating lever assembly (D) and the upper return spring (C).
|
| 3. |
Install the adjuster assembly (B) and the lower return spring (A).
|
| 4. |
Install the hub assembly and the parking brake assembly, and then install mounting bolts (A).
|
| 5. |
Install the parking brake cable (B), and then install the fixing clip (A).
|
| 6. |
Install the rear brake disc, then adjust the rear brake shoe clearance.
|
| 7. |
Install the brake caliper assembly.
(Refer to "Rear brake installation") |
| 8. |
Install the tire and wheel, after installing the plug on the disc. |
| 9. |
If the parking brake shoe or the brake disc are replaced a newly one, perform the brake shoe bed-in procedure.
|

| 1. |
Install the parking brake cable. |
| 2. |
Install the shift lever assembly.
(Refer to the Automatic Transaxle group - "Shift lever") |
| 3. |
Install the floor console.
(Refer to the Body group - "Console") |
| 4. |
Install the holding clip (B) and the cable adjusting nut(A) after fixing the parking brake cable.
|
| 5. |
Install the parking brake pedal, and then install the parking brake pedal mounting bolts (A) and nuts (B).
|

| 6. |
Adjust the parking brake pedal stroke by turning the adjusting nut (A).
|
| 7. |
Reconnect the parking brake switch connector (A).
|
| 8. |
Install the junction box.
(Refer to the Body Electrical System group - "Fuses and Relays") |
| 9. |
Install the reinforcing panel and crash pad lower panel.
(Refer to Body group - "Crash pad")
|
| Adjustment |
| 1. |
Raise the vehicle, and make sure it is securely supported. |
| 2. |
Remove the rear tire and wheel. |
| 3. |
Remove the plug (A) from the disc.
|
| 4. |
Rotate the toothed wheel of adjuster by a screw driver until
the disc is not moving, and then return it by 7~8 notches in the
opposite direction. |
| 5. |
Install the rear wheel & tire after installing the plug on the disc. |
| 1. |
Operate the parking brake pedal through a full stroke over 3 times for setting the parking cables. |
| 2. |
Adjust the adjusting nut(A) for parking barke pedal stoke 4~5 notches when operating effort is 196N(20kgf, 44lbf)
|
 Parking Brake Assembly Components and Components Location
Components (1) 1. Parking brake pedal2. Parking brake cable3. Equalizer assembly Components (2) 1. Backing plate2. Operating lever3. Upper spring4. Lower spring5. Adjuster6. Shoe hold down spring7. Shoe ...
 Electric Parking Brake (EPB) Components and Components Location
Components 1. EPB Unit2. EPB Switch3. Brake Caliper 4. EPB Warning Lamp5. AUTO HOLD Lamp ...
Other information:
Kia Optima Hybrid (TF HEV) 2016-2020 Service Manual: Components and Components Location
Components Location 1. Sub frame2. Assist arm3. Trailing arm4. Rear disc5. Rear upper arm6. Rear shock absorber7. Coil spring ...
Kia Optima Hybrid (TF HEV) 2016-2020 Service Manual: Flow Diagram
Power Flow Chart P,NUD/BLR/B26/B35R/COD/COWCE/C?????? ? Direction of Rotation ?Lower & Reverse Brake (LR/B) Activation > Overdrive (O/D) Hub Lock > Mid & Rear P/C Lock ?Input Shaft Rotation > Rear Sun Gear Rotation > Rear Inner Pinion Rotation (Reverse) > Rear Outer Pinion Rotation > Rear Annulus ...