Kia Optima Hybrid: Engine Control System / NVLD(Natural Vacuum Leakage Detection) Repair procedures
| Removal |
| 1. |
Turn the ignition switch OFF and disconnect the battery negative (-) terminal. |
| 2. |
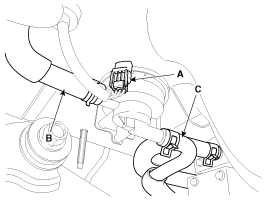
Disconnect the NVLD connector (A). |
| 3. |
Disconnect the ventilation hoses (B,C).
|
| 4. |
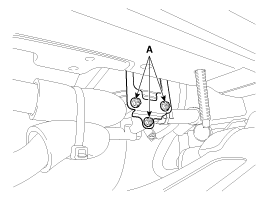
Remove the NVLD after by loosening the bolts (A).
|
| Installation |
| • |
Install the component with the specified torques. |
| • |
Note that internal damage may occur when the component is dropped.
If the component has been dropped, inspect before installing.
|
| 1. |
Install in the reverse order of removal. |
NVLD mounting bolt:
2.3 ~ 3.3 N.m (0.2 ~ 0.3 kgf.m, 1.7 ~ 2.5 lb-ft) |
| Inspection |
| 1. |
Turn ignition switch OFF. |
| 2. |
Disconnect the NVLD connector. |
| 3. |
Remove the NVLD. |
| 4. |
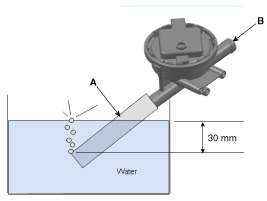
Connect the hose (A) to the canister hose connected port as below. |
| 5. |
After immersing the hose (A) in water, Apply more than 6 mbar (positive) pressure to Atmosphere port (B). |
| 6. |
If the NVLD is normal, many bubbles will indicate large leak.
|

| 1. |
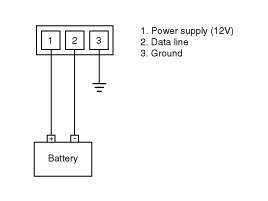
Connect power supply line and ground line to the NVLD terminals as below. |
| 2. |
Measure current between the NVLD terminal 1 and battery (+) terminal during NVLD switch open. |
| 3. |
Measure current between the NVLD terminal 1 and battery (+) terminal during NVLD switch closed. |
| 4. |
Measure current between the NVLD terminal 2 and battery (+) terminal during NVLD switch open. |
| 5. |
Check the current is within the specification.
|
 NVLD(Natural Vacuum Leakage Detection) Schematic Diagrams
Circuit Diagram ...
 Canister Close Valve (CCV) Description and Operation
Description Canister Close Valve (CCV) is installed on the canister ventilation line. It seals evaporative emission control system by shutting the canister from the atmosphere when leakage detecting system ...
Other information:
Kia Optima Hybrid (TF HEV) 2016-2020 Service Manual: Rear Seat Belt Repair procedures
Replacement Rear Seat Belt Replacement • When installing the belt, make sure not to damage the retractor. 1. Remove the following items first. • Rear seat assembly (Refer to the BD group - "Rear Seat") • Rear Pillar trim (Refer to the BD group - "Interior Trim") • Package tray trim ...
Kia Optima Hybrid (TF HEV) 2016-2020 Service Manual: General Safety Information and Caution
Safety Precaution Since hybrid vehicles contain a high voltage battery, if the high voltage system or vehicles are handled incorrectly, this might lead to a serious accidents like electric shock and electric leakage. • Be sure to shut off the high voltage by removing the ...