Kia Optima Hybrid: Cylinder Head Assembly / Valve Clearance Adjustment

Valve Clearance Inspection And Adjustment
   
Inspect and adjust the valve clearance when the engine is cold (Engine coolant temperature : 20°C (68°F)) and cylinder head is installed on the cylinder block.
1.
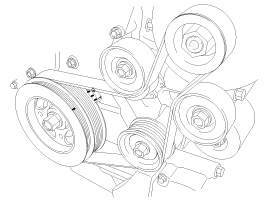
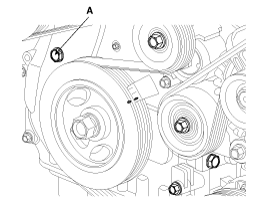
Remove the cylinder head cover. (Refer to Timing system in this group)
2.
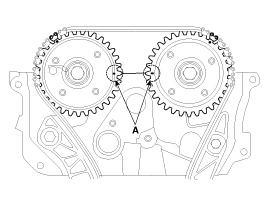
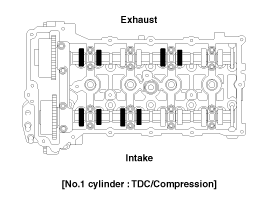
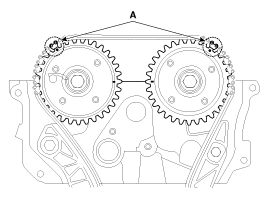
Set No.1 cylinder to TDC/compression.
(1)
Turn the crankshaft pulley and align its groove with the timing mark "T" of the lower timing chain cover.

(2)
Check that the TDC marks (A) of the CVVT sprockets are in straight line on the cylinder head surface as shown in the illustration.
If not, turn the crankshaft one revolution (360°)

3.
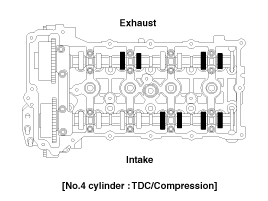
Inspect the valve clearance.
(1)
Check only the valve indicated as shown. Measure the valve clearance.

Using a thickness gauge, measure the clearance between the tappet and the base circle of camshaft.
Record the out-of-specification valve clearance measurements. They will be used later to determine the required replacement adjusting tappet.

Valve clearance (Engine coolant temperature : 20°C [68°F])
[Specification]
Intake : 0.17 ~ 0.23mm (0.0067 ~ 0.0090in.)
Exhaust : 0.27 ~ 0.33mm (0.0106 ~ 0.0129in.)

(2)
Turn the crankshaft pulley one revolution (360°) and align the groove with timing mark "T" of the timing chain cover.
(3)
Check only valves indicated as shown. Measure the valve clearance.

4.
Adjust the intake and exhaust valve clearance.
(1)
Set the No.1 cylinder to the TDC/compression.
(2)
Mark the timing chains (A) on the timing marks of the CVVT sprockets.

(3)
Turn the crankshaft pulley 15° clockwise.
(4)
Release tension on the timing chain using the SST 09240-2G000.
A.
Remove the bolt (A) from the service hole in the timing chain cover. It might be required to run a M8X1.25 tap in the hole to clean out the lock-tight (sealer) on the threads.
   
Ensure that debris does not enter into the engine through the open bolt hole.

B.
Pull and turn the loop (A) on the SST 09240-2G000 to allow the spring loaded shaft (B) to be pulled (locked) against the spring. Add a small amount of light lubricant to the threads of the tool and then thread it into the hole in the timing cover until you can feel it hit the tensioner. Then thread the tool back out about one turn.

C.
Turn the loop to unlock the tool.

D.
Slowly turn the tool counterclockwise. Depending on where the pin on the tool is located, a few clicks may be heard as the pin moves over the pawl and shaft. As you turn, you should be able to feel the spring loaded pawl being lifted. Once lifting the pawl, tighten the lock nut (A) and lift the chain and cam gear onto the cam.

(5)
Remove the front camshaft bearing cap.
(6)
Remove the exhaust camshaft bearing cap and exhaust camshaft.
(7)
Remove the intake camshaft bearing cap and intake camshaft.
   
When disconnecting the timing chain from the CVVT sprocket, tie or hold the timing chain so it does not fall into the timing cover.
(8)
Tie down timing chain so that it doesn''t move.
   
Be careful not to drop anything inside timing chain cover.
(9)
Measure the thickness of the removed tappet using a micrometer.

(10)
Calculate the thickness of a new tappet so that the valve clearance comes within the specified value.

Valve clearance [Engine coolant temperature : 20°C(68°F)]
T : Thickness of removed tappet
A : Measured valve clearance
N : Thickness of new tappet
Intake : N = T + [A - 0.20mm (0.0079in.)]
Exhaust : N = T + [A - 0.30mm (0.0118in.)]

(11)
Select a new tappet with a thickness as close as possible to the calculated value.
   
Shims are available in 47 size increments of 0.015mm (0.0006in.) from 3.00mm (0.118in.) to 3.690mm (0.1452in.)
(12)
Place the new tappet on the valve stem/spring.
(13)
Hold the timing chain, and install the intake camshaft and CVVT assembly.
(14)
Align the timing marks (A) on the timing chains and CVVT sprockets.

(15)
Install the exhaust camshaft and CVVT assembly.
(16)
Install the front bearing cap.
(17)
Install the service hole bolt after removing the SST from the service hole.

Tightening torque :
11.8 ~ 14.7N.m (1.2 ~ 1.5kgf.m, 8.7 ~ 10.8lb-ft)

   
To remove ratchet holder, loosen the lock nut and pull out the center rod.
(18)
Turn the crankshaft two turns in the operating direction(clockwise), and then check that the TDC marks (A) of the CVVT sprockets are in straight line on the cylinder head surface.

(19)
Recheck the valve clearance.

Valve clearance [Engine coolant temperature : 20°C(68°F)]
[Specification]
Intake : 0.17 ~ 0.23mm (0.0067 ~ 0.0090in.)
Exhaust : 0.27 ~ 0.33mm (0.0106 ~ 0.0129in.)

Cylinder Head Assembly

...

CVVT & Camshaft Components and Components Location

Components 1. Camshaft bearing cap2. Camshaft front bearing cap3. Exhaust camshaft4. Intake camshaft5. Exhaust CVVT assembly6. Intake CVVT assembly7. Exhaust camshaft upper bearing8. Intake camshaft lower ...

Other information:

Kia Optima Hybrid (TF HEV) 2016-2020 Service Manual: Automatic Transaxle Repair procedures


Removal     • Be sure to read and follow the “General Safety Information and Caution” before doing any work related with the high voltage system. Failure to follow the safety instructions may result in serious electrical injuries. • Be sure to shut off the high voltage circuit according ...

Kia Optima Hybrid (TF HEV) 2016-2020 Service Manual: Catalytic Converter Description and Operation


Description The catalytic converter of the gasoline engine is a three way catalyst. It oxidizes carbon monoxide and hydrocarbons (HC), and separates oxygen from the oxides of nitrogen (NOx). ...

© 2024 Copyright www.koptimatfhev.com