Use fender covers to avoid damaging painted surfaces.
•
To avoid damage, unplug the wiring connectors carefully while holding the connector portion.
Mark all wiring and hoses to avoid misconnection.
•
Be sure to read and follow the “General Safety Information
and Caution” before doing any work related with the high voltage
system. Failure to follow the safety instructions may result in serious
electrical injuries.
•
Be sure to shut off the high voltage circuit according to the
“High Voltage Shut-off Procedures” before doing any work related
with the high voltage system to avoid serious electrical injuries.
1.
Shut off the high voltage circuit. (Refer to “High Voltage Shutoff Procedure” in this group)
2.
Remove the engine cover.
3.
Remove the air cleaner assembly. (Refer to Engine and transaxle assembly in this group)
4.
Remove the RH front wheel. (Refer to SS group)
5.
Remove the under cover. (Refer to Engine and transaxle assembly in this group)
6.
Turn the crankshaft pulley and align its groove with the
timing mark of the timing chain cover to set the piston of No.1 cylinder
to the top dead center on compression stroke.
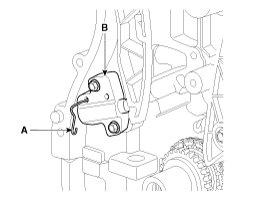
7.
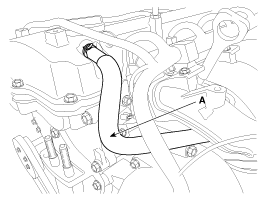
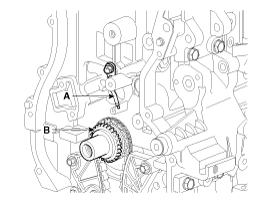
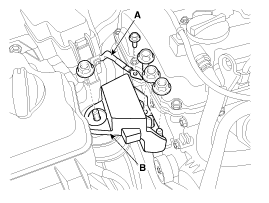
Disconnect the exhaust oil control valve (OCV) connector (A) and then remove the wiring from the cylinder head cover.
8.
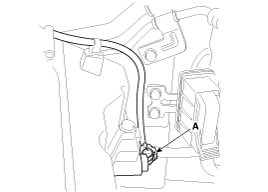
Disconnect the positive crankcase ventilation (PCV) hose (A).
9.
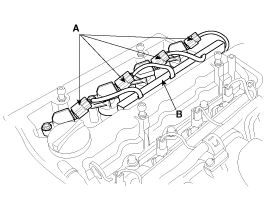
Disconnect the ignition coil connectors (A) and then remove the wiring protector (B).
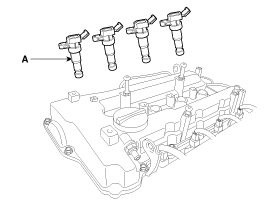
10.
Remove the ignition coils (A).
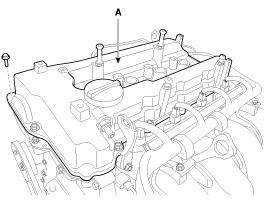
11.
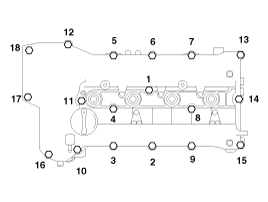
Remove the cylinder head cover (A).
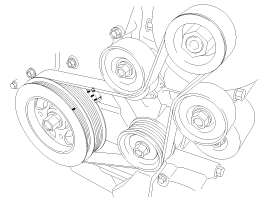
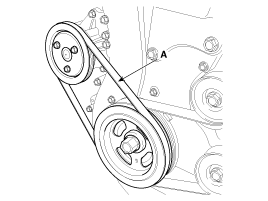
12.
Remove the water pump drive belt (A).
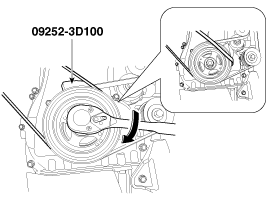
(1)
Put the SST (09252-3D100) between the crankshaft pulley and the drive belt.
(2)
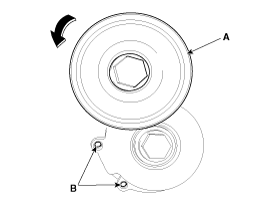
Rotate the crankshaft pulley clockwise. Then the drive belt is removed.
13.
Remove the drive belt.
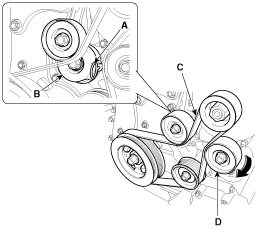
(1)
By rotating the #1 tensioner arm (A) counterclockwise, match the arm with the two tensioner stopper holes (B).
(2)
Insert the stopper pin (A) into the stopper holes matched with the #1 tensioner (B).
(3)
Remove the drive belt (C) after loosening the tension by rotating the #2 tensioner arm (D) clockwise.
14.
Remove the A/C compressor bracket (A).
15.
Drain the engine oil.
16.
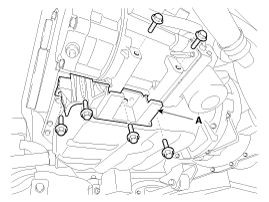
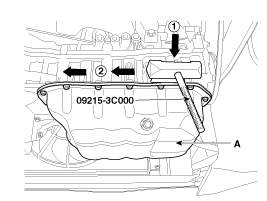
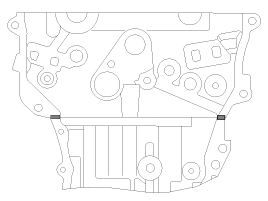
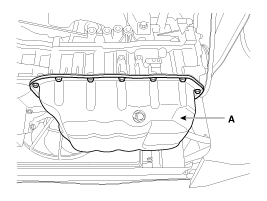
Remove the oil pan (A). Insert the blade of SST (09215-3C000)
between the ladder frame and oil pan. Cut off applied sealer and remove
the lower oil pan.
Loosen one oil pan bolt near each corner of the oil pan
leaving the bolts held in by about 2 threads. Then remove all other pan
bolts.
•
Insert the SST between the oil pan and the ladder frame by tapping it with a plastic hammer in the direction of arrow.
•
After tapping the SST with a plastic hammer along the direction of arrow around more than 2/3 edge of the oil pan, remove it from the ladder frame.
•
Do not turn over the SST abruptly without tapping. It is result in damage of the SST.
•
Be careful not to damage the contact surfaces of ladder frame and lower oil pan.
17.
Set the jack to the edge of ladder frame.
•
Put the wooden block between ladder frame and jack.
•
Be careful not to damage the balance shaft & oil pump module.
18.
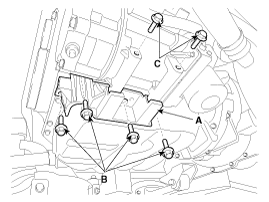
Disconnect the ground line (A), and then remove the engine mounting support bracket (B).
19.
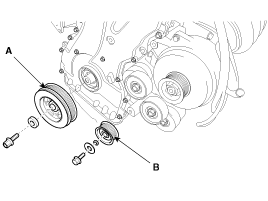
Remove the crankshaft pulley (A) and the idler (B).
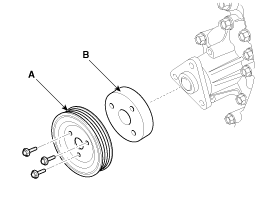
20.
Remove the water pump pulley (A) and the dust cover (B).
21.
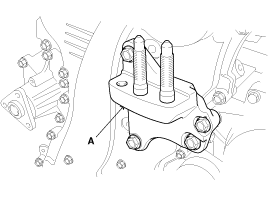
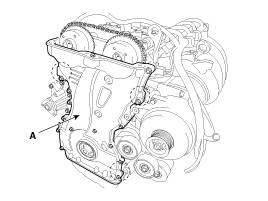
Remove the engine support bracket (A).
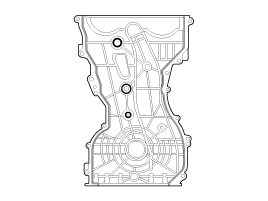
22.
Remove the timing chain cover (A) by gently prying the portions between the cylinder head and cylinder block.
Be careful not to damage the contact surfaces of cylinder block, cylinder head and timing chain cover.
23.
Make sure that the key of crankshaft is aligned with the
mating surface of main bearing cap. As a result of this, the piston of
No.1 cylinder is placed at the top dead center on compression stroke.
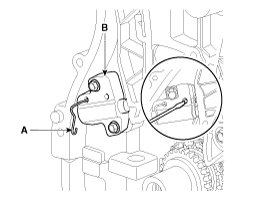
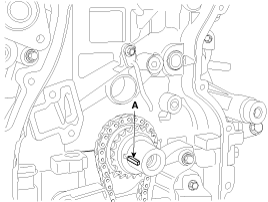
24.
Release the ratchet using a thin rod. Compress the piston and
then insert a stopper pin (A) into the hole on the ratchet to hold the
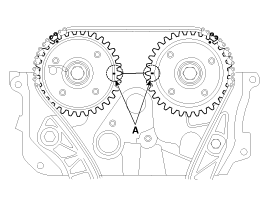
compressed piston. Remove the timing chain tensioner (B).
25.
Remove the timing chain tensioner arm (A).
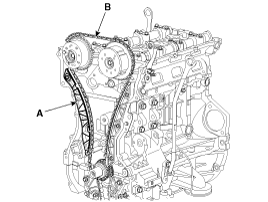
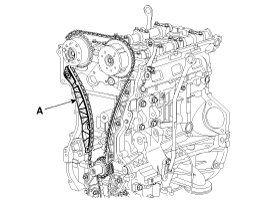
26.
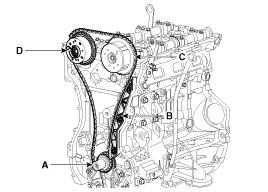
Remove the timing chain (B).
27.
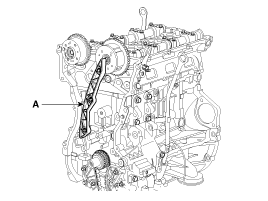
Remove the timing chain guide (A).
28.
Remove the timing chain oil jet (A) and the crankshaft chain sprocket (B).
29.
Remove the balance shaft chain.
Inspection
Sprockets, Chain Tensioner, Chain Guide, Chain Tensioner Arm
1.
Check the CVVT sprocket and crankshaft sprocket for abnormal wear, cracks, or damage. Replace as necessary.
2.
Inspect the tensioner arm and chain guide for abnormal wear, cracks, or damage. Replace as necessary.
3.
Check that the tensioner piston moves smoothly when the ratchet pawl is released with thin rod.
Drive belt, Idler, Pulley
1.
Check the idler for excessive oil leakage, abnormal rotation or vibration. Replace if necessary.
2.
Check belt for maintenance and abnormal wear of V-ribbed part. Replace if necessary.
3.
Check the pulleys for vibration in rotation, oil or dust deposit of V-ribbed part. Replace if necessary.
Installation
1.
Install the balance shaft chain. (Refer to Lubrication system in this group)
2.
Install the crankshaft chain sprocket (B) and the timing chain oil jet (A).
Tightening torque:
7.8 ~ 9.8N.m (0.8 ~ 1.0kgf.m, 5.8 ~ 7.2lb-ft)
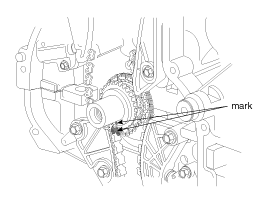
3.
Set the crankshaft so that the key (A) of crankshaft will be
aligned with the mating surface of main bearing cap. Put the intake and
exhaust camshaft assembly so that the TDC marks (B) of the intake and
exhaust CVVT sprockets will be aligned with the top surface of cylinder
head. As a result of this, the piston of No.1 cylinder is placed at the
top dead center on compression stroke.
4.
Install the timing chain guide (A).
Tightening torque:
9.8 ~ 11.8N.m (1.0 ~ 1.2kgf.m, 7.2 ~ 8.7lb-ft)
5.
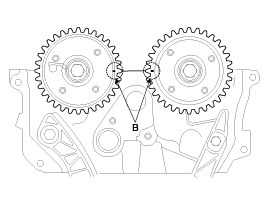
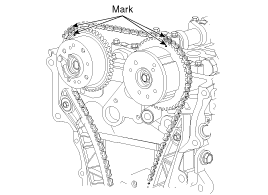
Install the timing chain. To install the timing chain with no slack between each shaft (cam, crank), follow the below procedure.
The timing marks of each sprocket should be matched with
timing marks (color link) of timing chain when installing the timing
chain.
6.
Install the timing chain tensioner arm (A).
Tightening torque:
9.8 ~ 11.8N.m (1.0 ~ 1.2kgf.m, 7.2 ~ 8.7lb-ft)
7.
Install the timing chain auto tensioner (B) and remove the stopper pin (A).
Tightening torque:
9.8 ~ 11.8N.m (1.0 ~ 1.2kgf.m, 7.2 ~ 8.7lb-ft)
8.
After rotating crankshaft 2 revolutions in regular direction
(clockwise viewed from front), confirm that the TDC marks (A) on the
intake and exhaust CVVT sprockets aligned with the top surface of
cylinder head.
9.
Install the timing chain cover.
(1)
Using a gasket scraper, remove all the old packing material from the gasket surfaces.
(2)
The sealant locations on chain cover and on counter parts
(cylinder head, cylinder block, and ladder frame) must be free of engine
oil and etc.
(3)
Before assembling the timing chain cover, liquid sealant
Loctite 5900H or equivalent should be applied on the gap between
cylinder head and cylinder block. The part must be assembled within 5
minutes after sealant was applied.
Bead width: 2.5mm (0.10in.)
(4)
After applying liquid sealant Loctite 5900H or equivalent on the timing chain cover.
The part must be assembled within 5 minutes after sealant was
applied. Continuous bead of sealant should be applied to prevent any
path of oil leakage.
Bead width: 3.0mm (0.12in.)
(5)
The dowel pins on the cylinder block and holes on the timing
chain cover should be used as a reference in order to assemble the
timing chain cover to be in exact position.
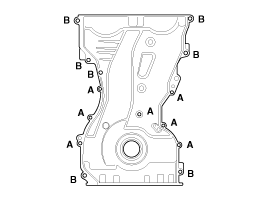
Tightening torque:
Bolts A (M6?25) :
7.8 ~ 9.8N.m (0.8 ~ 1.0kgf.m, 5.8 ~ 7.2lb-ft)
Bolts B (M8?28) :
18.6 ~ 22.5N.m (1.9 ~ 2.3kgf.m, 13.7 ~ 16.6lb-ft)
The engine starting or pressure tests should not be performed within 30 minutes after the timing chain cover was assembled.
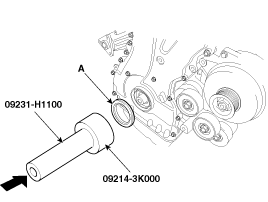
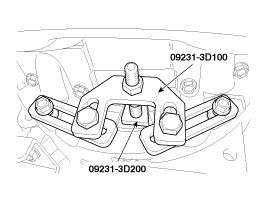
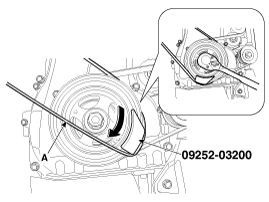
Use the SST (09231-3D100, 09231-3D200) to install the crankshaft pulley bolt.
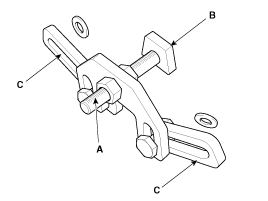
1)
Remove the service cover (A) on the bottom of the ladder frame and unfasten the two transaxle mounting bolts (B).
2)
Rotate the crankshaft pulley clockwise until a groove (A) on the torsion damper comes in sight.
3)
Adjust the length of the holder (A) so that the front plate of the holder (B) puts in the groove at the closest position.
4)
Adjust the angle of the links (C) so that the two transaxle mounting bolts can be fastened to the original mounted holes.
5)
Install the SST (09231-3D100, 09231-3D200) using the two
transaxle mounting bolts and spacers. Tighten the bolts and nuts of the
holder and links securely.
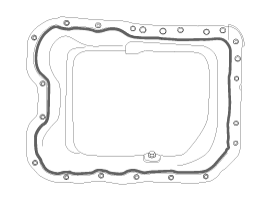
Using a gasket scraper, remove all the old sealant material from the gasket surfaces.
(2)
Before assembling the oil pan, liquid sealant Loctite 5900H,
Threebond 1217H or equivalent should be applied on oil pan. The part
must be assembled within 5 minutes after sealant was applied.
Bead width : 2.5mm (0.10in.)
•
When applying sealant gasket, sealant must not be protruded into the inside of oil pan.
•
To prevent leakage of oil, apply sealant gasket on the inner threads of the bolt holes.
(3)
Install the oil pan (A). Uniformly tighten the bolts in several passes.
Tightening torque
Bolts B (M9) :
30.4 ~ 34.3N.m (3.1 ~ 3.5kgf.m, 22.4 ~ 25.3lb-ft)
Bolts C (M6) :
9.8 ~ 11.8N.m (1.0 ~ 1.2kgf.m, 7.2 ~ 8.7lb-ft)
After assembly, wait at least 30 minutes before filling the engine with oil.
Rotate the drive belt #2 tensioner arm (A) clockwise moving
the tensioner pulley bolt with wrench. After putting the belt (B) on the
tensioner pulley, release the tensioner pulley slowly.
The firing and/or blow out test should not be performed within 30 minutes after the cylinder head cover was assembled.
22.
Install the ignition coils (A).
Tightening torque :
3.9 ~ 5.9N.m (0.4 ~ 0.6kgf.m, 2.9 ~ 4.3lb-ft)
23.
Install the wiring protector (B), and then connect the ignition coil connectors (A).
24.
Connect the positive crankcase ventilation (PCV) hose (A).
25.
Connect the exhaust Oil control valve (OCV) connector (A).
26.
Install the under cover. (Refer to Engine and transaxle assembly in this group)
27.
Install the RH front wheel. (Refer to SS group - "Wheel")
28.
Install the air cleaner assembly. (Refer to Engine and transaxle assembly in this group)
29.
Install the safety plug in the trunk. (Refer to Engine and transaxle assembly in this group)
30.
Install the engine cover.
31.
Add all the necessary fluids and check for leaks. Connect GDS. Check for codes, note, and clear. Recheck.
•
Refill engine with engine oil.
•
Clean battery posts and cable terminals and assemble (12 Volt only).
•
Inspect for fuel leakage.
–
After assemble the fuel line, turn on the ignition switch (do
not operate the starter) so that the fuel pump runs for approximately
two seconds and fuelline pressurizes.
–
Repeat this operation two or three times, then check for fuel leakage at any point in the fuel line.
Inspection 1. Check the continuity between the terminal and the body with an ohmmeter. If there is no continuity, replace the oil pressure switch. 2. Check the continuity between the terminal and the body when the fine wire is pushed. If there is continuity even when the fine wire is pushed, replace ...
Inspection 1. Turn the ignition switch OFF. 2. Disconnect the OCV connector. 3. Measure resistance between the OCV terminals 1 and 2. 4. Check that the resistance is within the specification. Specification: 6.9 ~ 7.9? [20°C(68°F)] Removal 1. Turn the ignition switch OFF and disconnect the battery negative ...


 arrow.
  arrow around more than 2/3 edge of the oil pan, remove it from the ladder frame.
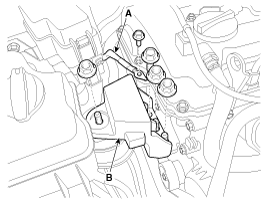
 > Idler
  > Tensioner #2 pulley
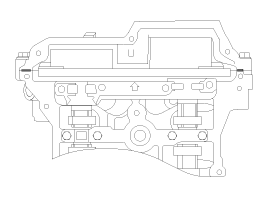
 Timing Chain Components and Components Location