Kia Optima Hybrid: Cooling System / Thermostat Repair procedures
| Removal and Installation |
Disassembly of the thermostat would have an adverse effect,
causing a lowering of cooling efficiency. Do not remove the thermostat,
even if the engine tends to overheat. |

| 1. |
Drain engine coolant so its level is below thermostat. |
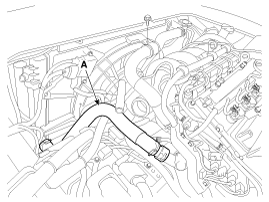
| 2. |
Disconnect the radiator lower hose (A).
|
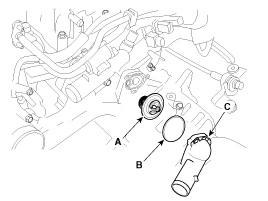
| 3. |
Remove water inlet fitting (C), gasket (B) and thermostat (A).
|
| 4. |
Installation is reverse order of removal. |
|
| 1. |
Fill the engine coolant. |
| 2. |
Start the engine and check for leaks. |
| 3. |
Recheck the coolant level. |
| Inspection |
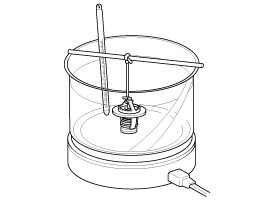
| 1. |
Immerse thermostat in water heated to over 95°C (203°F), then heat for at least 3 minutes to check valve lift.
|
| 2. |
Check the valve opening temperature.
If the valve opening temperature is not as specified, replace the thermostat. |
| 3. |
Check the valve lift.
If the valve lift is not as specified, replace the thermostat. |
 Water pump Troubleshooting
Troubleshooting SymptomsPossible CausesRemedyCoolant leakage • From the bleed hole of the water pump Visually check • Check leaks after about ten-minute warming up. • If coolant still leaks, replace ...
 Thermostat Troubleshooting
Troubleshooting SymptomsPossible CausesRemedyCoolant leakage • From the thermostat gasket Check the mounting bolts • Check the torque of the mounting bolts • Retighten the bolts and check leakage ...
Other information:
Kia Optima Hybrid (TF HEV) 2016-2020 Service Manual: Camshaft Position Sensor (CMPS) Description and Operation
Description Camshaft Position Sensor (CMPS) is a hall sensor and detects the camshaft position by using a hall element. It is related with Crankshaft Position Sensor (CKPS) and detects the piston position of each cylinder which the CKPS can''t detect. The CMPS is installed on engine head cover and uses ...
Kia Optima Hybrid (TF HEV) 2016-2020 Service Manual: Rear Window Glass Repair procedures
Removal • Put on gloves to protect your hands. • Be careful not to damage the painted surface. 1. Remove the following items. • Roof moulding (Refer to the BD group- "Panoramaroof") • Rear seat (Refer to the BD group- "Rear Seat") • Rear pillar trim (Refer to the BD group- "Interior ...